enFact
enFact consists of two sections:
The Register Artifacts tool  is designed to organize data including pictures, manuals, and videos etc. The register artifacts tool allows you to associate these files with either an (X, Y) location or spatial feature on the map by using a symbol to mark the map location. Artifacts can have metadata associated with them and be classified into artifact types.
Once an artifact has been registered it can be accessed, edited and deleted using the Maintain Artifacts tool  . You can view all or selected artifacts using this tool and zoom to selected features on the map.
 Register Artifacts
To access the enFact Registration process select the Register Artifacts icon ![]() from the main enlighten toolbar. The following screen is then displayed:
from the main enlighten toolbar. The following screen is then displayed:
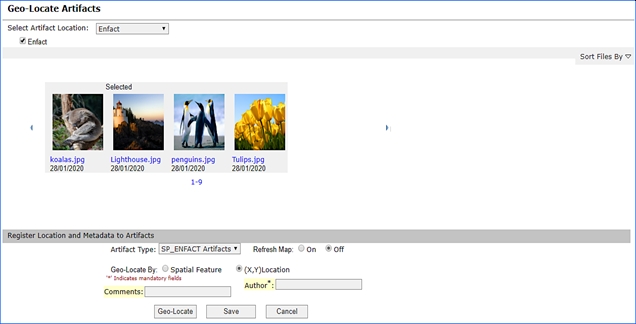
Fig: enFact Registration Page
Select a network directory from the drop-down list. The network directory and its contents will be set up by your enlighten administrator.
Once you have selected a directory from the drop-down list one or multiple check-boxes will be displayed. Select your desired data type described in the checkbox and associated files will be displayed in a ribbon view.
You can view the artifacts by scrolling through the list. In the screenshot above, a superscript of M is displayed for each artifact indicating that the artifact is already registered to a location or feature on the map.
To view a larger version of the artifact in its native browser, click on the file name (blue name). You can select single or multiple artifacts by clicking on the image. Once an image is selected you will see Selected appear on top of the image.
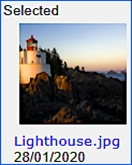
Fig: Selected Artifact
Once you have selected the artifacts to be Geo-located, select an artifact type from the drop-down list.
Artifact types are categories set up by the enlighten administrator in which artifacts can be classified. Select the category that best describes your artifact and more options will become available.
Two means are available for geo-locating data:
- Spatial Feature: Represents a location on the map, for example, a pipe or parcel.
- (X, Y) Map Location: Represents a set of coordinates or a single defined point on the map.
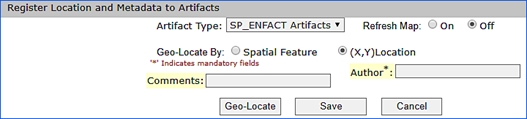
Fig: Metadata for Artifact Type
The next step is to Input the Metadata into the display fields, mandatory fields are denoted by a * next to the name.
You can also select whether you would like the map to refresh automatically or if you would like to control the map refresh.
Metadata for each artifact type is configured by your enlighten administrator. The metadata that is mandatory is denoted by (*). To geo-locate an artifact, the following steps are required:
- Select the Geo-Locate button.
- Go to the enlighten map.
- Select either your (X, Y) location that will be displayed to the left of the metadata or,
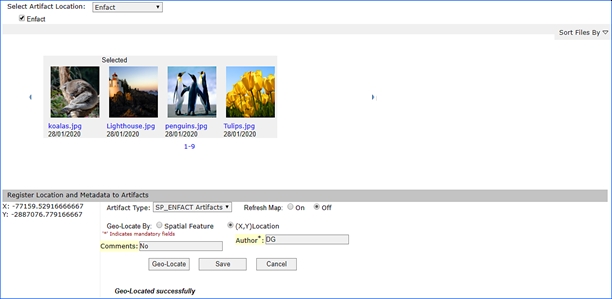
Fig: Geo-Locating by (X,Y) Location - If you are selecting by spatial feature you can select one or more spatial features by holding the shift key to select multiple objects on the map.
- Return the register artifacts dialog box.
- Select the Save button.
- If you have selected on for map refresh then symbol will automatically appear in the location chosen, otherwise refresh the map to view your symbol.
 Maintain Artifacts
Maintenance of geo-located artifacts can be performed by clicking on the Maintain Artifacts icon ![]() from the main enlighten toolbar. Alternatively, you can select an artifact symbol on the map and click maintain artifacts to bring up the Maintain Geo-Located Artifacts dialog box.
from the main enlighten toolbar. Alternatively, you can select an artifact symbol on the map and click maintain artifacts to bring up the Maintain Geo-Located Artifacts dialog box.
Select Artifacts by Artifact Type
When no items are selected on the map you can search through your artifacts by image type. When an image type has been selected from the drop-down list, all the objects that have been associated with it are available along the ribbon. You can see which artifact is selected due to a grey background that appears around it.
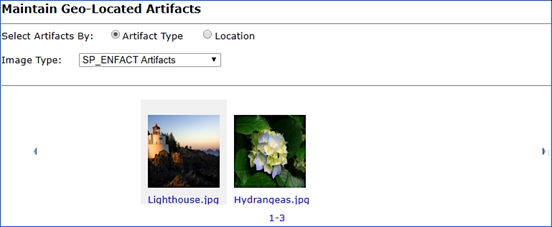
Fig: Maintain Geo-Located Artifacts by Artifact Type
To view more information about an artifact, select it from the ribbon. Two more sections will then appear on the page.
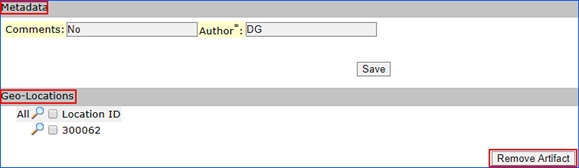
Fig: enFact Maintain Artifacts Dialog Box
- Update Metadata: This screen allows editing of the metadata associated with artifacts. Type over existing metadata, add or delete text and save to update.
- Zoom to One or More Locations: An artifact with multiple locations will be displayed as below. To zoom to all locations on the map click on the magnifying glass with ‘All’ to the right. To view, a specific artifact click on the magnifying glass next to the desired location.
- Remove Artifact from One or More Locations: To remove an artifact from one or more locations select the artifact by ticking the box next to the ‘Location ID’ and clicking on the ‘Remove artifact’ button.
Select Artifacts by Location
Select an artifact on the map and then click on the Maintain Artifacts tool, this will bring up the following screen.
The artifact selected will be shown in the ribbon view along with its associated metadata. All the locations where this artifact is saved will be shown in the Geo-Locations section. The location where the object is selected on the map is represented by an asterisk (*).
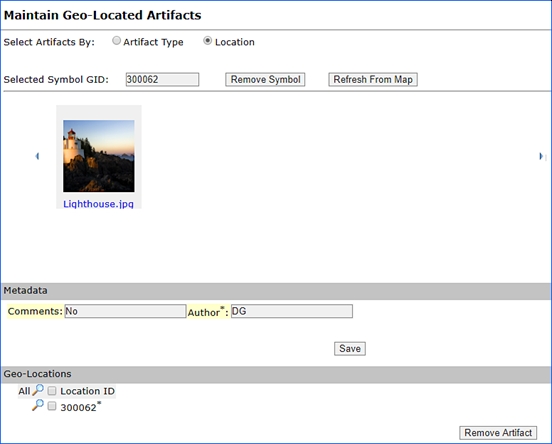
Fig: enFact Maintenance Dialog Box
Base Tools on enlighten Task Pane
The Enlighten Task Pane is opened by selecting the Task Pane icon ![]() on the Main Toolbar, and provides the user with various Base tools functionality, Quick Links to specific areas on the map, and links to online Help documentation.
on the Main Toolbar, and provides the user with various Base tools functionality, Quick Links to specific areas on the map, and links to online Help documentation.
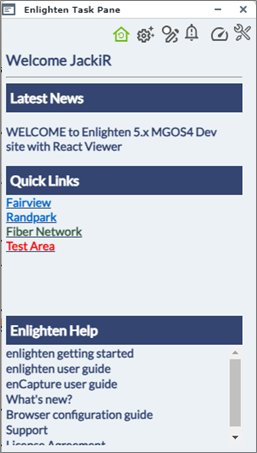
Fig: Enlighten Task Pane
The Enlighten Task Pane provides the user access to the following enlighten Base Tools:
 Home
Home-
 Set User Options
  /
/  Redline Notifications (Active/Inactive)
-
 /
/  Check Notifications (Active/Inactive)
 -
 Map Performance Tool
 -
 Admin View
Home
The Home tool ![]() resets the Enlighten Task Pane pane back to it's default state and displays the home menu, giving you access to the base tools. The user also has access to the application documentation by selecting the following documentation hyperlinks:
resets the Enlighten Task Pane pane back to it's default state and displays the home menu, giving you access to the base tools. The user also has access to the application documentation by selecting the following documentation hyperlinks:
- enlighten getting started
- enlighten user guide
- enCapture user guide
- What’s new?
- Browser configuration guide
- Support
- License Agreement
Selecting the Support link opens the Support dialog box where a support issue can be logged. This support issue is sent to the organization's internal support email as configured by the enlighten Administrator. Selecting the License Agreement link opens the Open Spatial Licenses and Services Agreement on the Open Spatial website.
If any Quick Links have been defined by the enlighten Administrator, these quick links will be displayed in the enlighten Task Pane. When the user clicks on a Quick link hyperlink, the map will zoom to the extents of the zoom window. Quick Links are managed by the enlighten Administrator using the Broadcast News functionality in the Site Administration, and saves the screen center X;Y coordinate, the zoom scale and a Quick Link name describing the area.
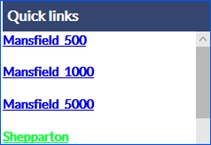
Fig: Quick link examples
Manage User Options
The Manage User Options pane provides the ability for users to customize the display settings and enlighten environment for their individual enlighten sessions. This includes retaining the on/off state of toolbars and panes, which layer profile and filters are applied, restoring the map scale and location, and retain which form is applied when the Show Information pane is opened. Other options which can be set by the user relate to the level of transparency applied to panes and toolbars, as well as the default selection colour.
The Set User Options allows the user the option to make the following changes:
- Save Toolbar/Pane State on logout
- Save Location/Scale on logout
- Save Layer Profile on logout
- Restore Last Map
- Save Selected External Provider
- Save layer filters
- Save Active Report
- Manual Feature Tooltips
- Use Large Icons
- Toolbars and Panes Transparency slider
- Point Selection Buffer Pixels
- Use or Set Default Selection Color
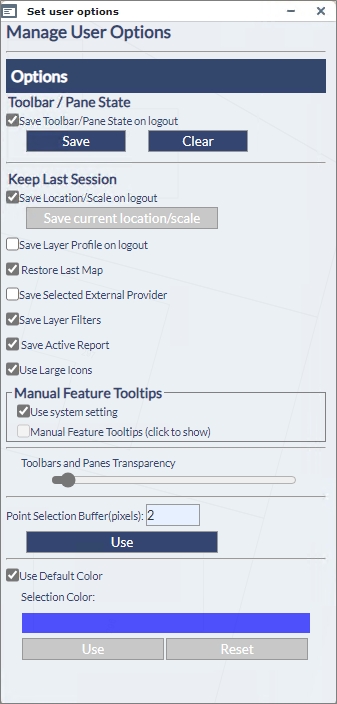
Fig: Manage User Options
Default State
When a user opens an enlighten session for the first time, the Main Toolbar and the enlighten Toolbar are displayed with large icons, the Selection mode is set to being active on the enlighten toolbar, and the map is zoomed to the map extents using the map coordinates and map scale setup by the GIS administrator. On the Manage Users Options pane, the Save Toolbar/Pane State on logout and the Use Large Icons options are automatically ticked, and the Toolbars and Panes Transparency is set to 15%. The Point Selection Buffer value is set to use the default value assigned by the Administrator, and the Selection Color is set to use the default color. This setup is referred to as the System Default state.
If the user selects the Show/Hide icon ![]() on the Main toolbar for the first time, the Layers Pane and Enlighten Task Pane are displayed. If the user selects the Show/Hide icon again, the enlighten toolbar, Layer pane and enlighten pane are closed. However, if during the first enlighten session, the user opens any task panes or toolbars and then logs off, the state of any open toolbars and/or panes is retained for their next enlighten session because of the Save Toolbar/Pane State on logout being checked by default.
on the Main toolbar for the first time, the Layers Pane and Enlighten Task Pane are displayed. If the user selects the Show/Hide icon again, the enlighten toolbar, Layer pane and enlighten pane are closed. However, if during the first enlighten session, the user opens any task panes or toolbars and then logs off, the state of any open toolbars and/or panes is retained for their next enlighten session because of the Save Toolbar/Pane State on logout being checked by default.
When a user logs into enlighten for any subsequent session, the Main Toolbar and the enlighten Toolbar are displayed by default, however the settings applied to the toolbar size and transparency are applied. When selecting the Show/Hide icon on the Main toolbar, the toolbar/pane status of their previous session for any open toolbars and/or panes is restored.
Save Toolbar/Pane State on Logout
The Save Toolbar/Pane State on Logout setting, when checked, retains the state of toolbars and panes for subsequent enlighten sessions, so that when a user logs onto enlighten, their enlighten environment in terms of which toolbars and panes are displayed by default, is restored. So when the user logs into enlighten and selects the Show/Hide icon on the Main Toolbar, which ever toolbars and/or panes were displayed at the time they logged off from their previous session, will be restored for the current session.
The function of the Save and Clear buttons in conjunction with the Save Toolbar/Pane State on Logout setting can best be described in the examples below where the user can change their own default display status for opening the required toolbars and panes by following the examples below:
To set and save your own default toolbar and pane preference
- Open the toolbars and panes that you want to set for your default enlighten environment.
For example, open the Redline pane, the Layers pane and the Basic Info pane. - Select the Task Pane icon
 to open the Enlighten Task Pane.
 - Select the Set User Options icon to open the Manage User Options pane.
- Select the Save button to save the current toolbar and pane status to your user's cache.
- Regardless of whichever toolbars and panes are opened during the remainder of the current session, the next time the user opens their enlighten session, the cached toolbar and pane settings are restored, and, as per the example in point 1 above, the status of the Redline pane, the Layers pane and the Basic Info pane is restored for the next enlighten session.
To save the current toolbar and pane state at the time you logout
- Select the Task Pane icon to open the Enlighten Task Pane.
- Select the Set User Options icon to open the Manage User Options pane.
- Tick the check-box for the Save Toolbar/Pane State on Logout.
- Whichever toolbars and panes were opened at the time you logged off will be set as the default state, and, as per the example in point 1 above, the status of the Advanced Toolbar, the Show Info pane and the Basic Info pane is restored for the next enlighten session.
To restore the system default state
- Select the Task Pane icon to open the Enlighten Task Pane.
- Select the Set User Options icon to open the Manage User Options pane.
- Un-tick the check-box for the Save Toolbar/Pane State on Logout.
- Select the Clear button to clear the your user's cache.
- Logoff your enlighten session, log back in and the system default status for the toolbars and panes is restored.
The behavior for first time user is described in the topic Default State.
Save Location/Scale on Logout
The Save Location/Scale on logout option allows the user to easily save the current location and scale of the map when the user logs out of enlighten. This is a feature which makes it convenient for the user to be directed to that specific point at logon, saving time in the process.
Save Layer Profile on Logout
This option within the Manage User Options pane, allows the user to save the current/applied layer profile when the user logs out of enlighten. Hence when the user logs back into enlighten, the layer profile which was saved on logout will be activated.
This is the same function as the Save on Logout function found within the Layer Profiles function.
Restore Last Map
When the Restore Last Map check-box is ticked then the default map will be restored when the site is reloaded by pressing F5. If the Reload Default Map icon ![]() is selected from the Enlighten toolbar, the default map will be restored.
is selected from the Enlighten toolbar, the default map will be restored.
If the user turns on the Save Layer Profile on Logout option, then this layer profile settings will be maintained when the user logs out and back into enlighten. If the Save Layer Profile on Logout option is turned on, and then the user turns on the Restore Last Map option then the initial Save Layer Profile on Logout option will be disabled.
Save Selected External Provider
This setting restores the External Provider selected at the end of the last session when the user closed or logged out of enlighten. See the Add External and Local Layers pane topic for more details on how the External Provider is set.
Save Layer Filters
The save layer filters allows the user to save the current filter on a specific layer, when logging out and thereafter logging into enlighten. If this option is not ticked then when the user logs out of enlighten then the layer filter would automatically cleared.
The Save Layer Filters option under the Manage Users Options is the same function as the option found within the Layer Filters functionality.
Save Active Report
Save Active Report enables the user to view the last secondary Show Info form which was viewed, from within the detail view, as opposed to returning the primary Show Info form by default. This feature is beneficial when the user is concerned with a specific secondary form, and in some instances where there are multiple secondary forms it would save the user time and effort.
User Option Feature Tooltips
Within the enlighten map, authored layers can be setup to display tool-tips to show configured attribute information in a mouse-over text box. Complex tool-tips compiled in html can be added to the tool-tip settings in MapGuide Maestro as part of the layer configuration.
There are two options available in the Manage User Options which manage the display of tool-tips within the enlighten map.
- Use system setting If this check-box is ticked the system setting configured by the administrator is applied. These are the two system settings:
- Automatic: This option is the standard option for displaying mouse-over tool-tips.
- Manual: This option requires the user to click on the map object to display tool-tips.
- Manual Feature Tooltips (click to show) This toggle setting allows the user to override the system setting for the display of tool-tips. The user must first un-tick the Use system setting check-box and then either tick or un-tick the Manual Feature Tooltips check box.
- An un-ticked Manual Feature Tooltips check-box displays the tool-tips when completing a mouse-over on the map object.
- A ticked check-box requires the user to select the map object in order to display the tool-tip.
Use Large Icons
This feature alters the size of the icons displayed on the toolbars and when set, makes the icons much larger for viewing purposes. This can very effective and useful when using a browser on a tablet or phone as the display would be larger and easier to view and select. On the other hand, using smaller icons provides more real-estate space on the map to display other panes more efficiently.
By default, when the user opens their first session of enlighten, the icons are set to be displayed as large icons. If the icons are set to small, the icon descriptions on the Main Toolbar are not displayed. None of the horizontal Toolbars display any text below, however the tool-tips can be switched on or off using the Show/Hide tool-tips setting on the enlighten Toolbar.
![]()
Fig: Large and Small icons for the enlighten Task Pane
Toolbars and Panes Transparency
The user has the option to alter the transparency level of the Panes and Toolbars. This setting is saved when the user logout and is restored for the next enlighten session. The transparency scroll bar sets the opacity level of the Toolbars and Panes. If the scroll bar is set all the way to the left, the transparency level is set to 0% (non-transparent), and conversely, if the scroll bar is set all the way to the right the transparency level is set to 100% (fully transparent).
![]()
Fig: Setting Toolbars and Panes transparency
Point Selection Buffer - Pixels
Users can specify the point selection buffer size so that they can select single point features of various sizes on the map. This value is measured in pixels and the default value is set to 2. Any changes to the setting is retained for subsequent sessions if the Use button is selected to effect the new pixel size entered.
Use Default Colour Selection Colour
When this option is ticked then the user’s specified selection colour is ignored, and overwritten with the Default Selection colour. This can be useful for instances when the user wishes to revert back to a standardized selection to maintain consistency.
For users who wish to customize the selection colour the the users should:
- Click on the Selection Colour bar.
A Colour Picker dialog should then be displayed, where the user can then pick a colour
- Click on a desired colour to select it for map selections.
- Applying the change by clicking on the OK button.
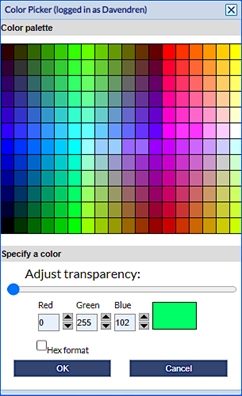
Fig: Colour Picker dialog
Check Notifications
The Check Notifications icon ![]() is a function within enlighten which alerts the user logged in of any changes made to their profile. When the enlighten administrator makes changes such as assigning/un-assigning of layers and functions to/from a certain user, the user would receive a flashing Check Notifications icon
is a function within enlighten which alerts the user logged in of any changes made to their profile. When the enlighten administrator makes changes such as assigning/un-assigning of layers and functions to/from a certain user, the user would receive a flashing Check Notifications icon ![]() indicating a change has occurred.
indicating a change has occurred.
- If the enlighten administrator is making changes to a particular user, and if that particular user is not logged into enlighten or is not in the Mapview page, then the user would not be notified (through the Check Notifications feature) of the changes just made.
Once the enlighten administrator is done making changes to a particular user’s profile, the user (who is logged into enlighten, and on the Mapview page) will see a red exclamation mark on the check notifications icon. The user will then have two options:
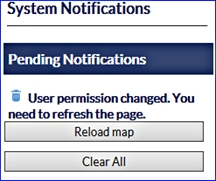
Fig: System Notifications - Reload Map: This would Reload the Map, so the user can see the new layers/functions assigned by the enlighten administrator.
- Clear All: This would Clear the notification hence removing it from the Check Notifications section.
Map Performance Tool
To start Map Performance testing the following steps can be followed:
- In enlighten Map View select the Map Performance Tool in the toolbar.
- Log in with the OSPerformance user details.
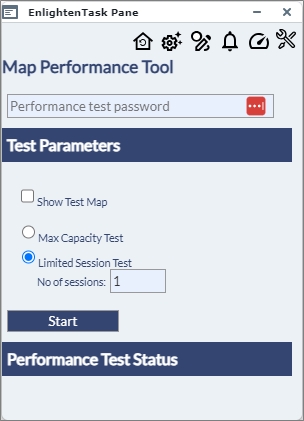
Fig: Map Performance Tool - Define the Map Performance Tool:
- Show Test Map: Display a section of the main map. Each Map Performance Test consists of automatically running a set number of zooming and panning tasks on the main map.
- Max Capacity Test: Will activate map sessions continuously until the capacity of the enlighten Map Server is reached.
Note: That this test will cause the eventual failure of the Map Server. Refreshing the browser will halt the function. - Limited Session Test: Allows the User to nominate the number of sessions to be activated during the test run. This option will allow the user to undertake consecutive test runs with a varying number of sessions during each run.
- No of sessions: The number of consecutive tests to run when selecting a Limited Session Test.
The progress of the test runs, and the test performance details are displayed under the Performance Test Status area.
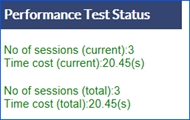
Fig: Performance Test Status area
Admin View
The Admin View tool ![]() takes you directly into the Administrator screen, however only users with Administration privileges will see this icon on their Enlighten Task Pane and have access the to the enlighten Administrators Guide documentation links.
takes you directly into the Administrator screen, however only users with Administration privileges will see this icon on their Enlighten Task Pane and have access the to the enlighten Administrators Guide documentation links.
The Context Menu
The context menu can be accessed by right-clicking within the map view. The menu gives access to different commands for navigating around the map, retrieving information on map objects or modifying map properties.
The commands most commonly found in the context menu are described in the following list of commands.
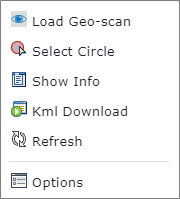
Fig: Context Menu Options
 Load Geo-scan
The Load Geo-scan command loads the scanned image as a back-drop on the layer Geo Scan Images for the selected Geo-scan boundary. See the section Geo-scan Images for more information.
 Select Circle
When using the Select Circle context menu option, the user is required to select a point on the map to use as the center point of the circle in the area of interest, and then drag the circle to the desired radius around the objects of interest. On the Select Circle pane the Measurement units displays the selected unit of measurement and below the radius distance is dynamically diplayed as the circle radius is dragged smaller or bigger on the map.
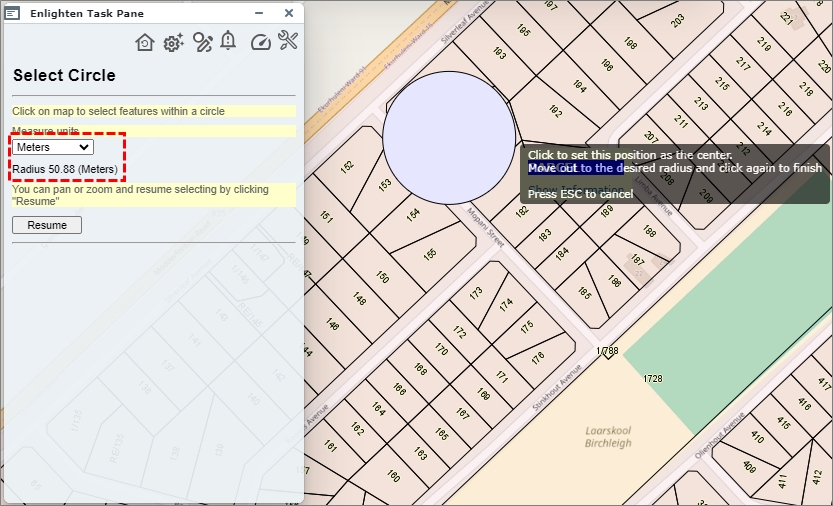
Fig: Select Circle context menu option
When the user completes drawing the circle on the map, the objects crossing that circle are created as a selection set and highlighted on the map using the configured selection color.

Fig: Selection set created where the circle crossed objects on map
 Show Info
This function allows the user to open the Show Info pane within the context menu of Enlighten. Objects should be selected first, then right-click on the map which will bring up the context menu. From there the user can select the Show Info function.
 KML Download
To download a KML file consisting of the map selections, the administrator should ensure that the relevant KML viewer is installed on the users workstation.
The user is first required to select the objects on the map that they wish to export to a .kml file, then right click on the map and select the Kml Download option from the context menu. Once clicked the user must select Click to Open link where the kml file will be downloaded to the users download folder.

Fig: Kml Download - Click to Open option
On completion the downloaded file displays in the bottom left hand corner of the browser window. The file can then be saved in an appropriate location or opened directly in a KML viewer application such as GoogleEarth™.
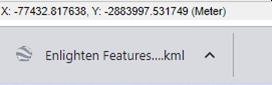
Fig: Kml Downloaded File
 Refresh
Refreshes the map and reloads all layers, keeping the current center and scale. Refresh Map does not remove selections or layers.
 Options
The view options tab in the right-click context menu opens the Viwer Options pane on the screen screen giving the user the option of setting the Tooltips to display automatically or switch off, to Manually click on the object to display the tooltip, to enable pan dragging for the select tool, to set Layer Transparency and to set the display units metric or imperial measurements.
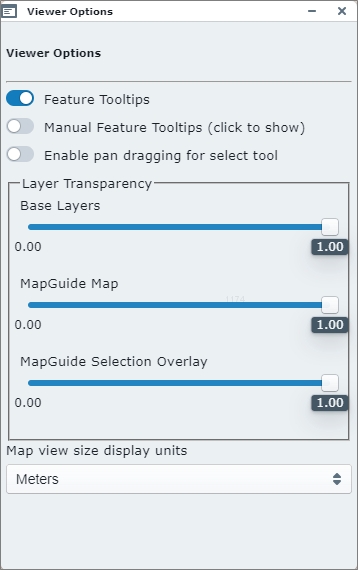
Fig: Context Menu Viewer Options
Feature Tooltips
The Feature Tooltips ON/OFF switch allows for configured tool-tips to be displayed by default when the user moves their mouse over certain layer objects. The tool-tip must be setup on the Layer configuration in MapGuide Maestro in order to be displayed.
When this toggle switch is set be being ON, the Show/Hide Tool-tips icon on the Enlighten Toolbar is set to be ON and tool-tips will display using either the System Settings, or as per the settings set on the Manage User Options pane. When this toggle switch is set be being OFF, the Show/Hide Tool-tips icon on the Enlighten Toolbar is set to be OFF and no tool-tips will display.
Manual Feature Tooltips
The Manual Feature Tooltips is a toggle setting allowing the user to override the system setting for the display of tool-tips.
- If set to ON the tool-tips are displayed when doing a mouse-over on the map object.
- If set to OFF the user is required to select the map object in order to display the tool-tip.
Enable pan dragging for select tool
The Enable pan dragging for select tool if set to ON allows the user pan while making selections of objects on the map.
Layer Transparency
There are 3 different Layer Transparency settings available on the Viewer Options pane.
- The Base Layers transparency slider sets the transparency level for the External Provider layer, for example, Open Street Maps.
- The MapGuide Map transparency slider sets the transparency level for all layers in the Basemap Layer Group.
- The MapGuide Selection Overlay transparency slider sets the transparency level of selected objects in the map.
Map view size display units
The user can change the display units in the map by selecting an option from the drop-down list. This updates the map units displayed on the map status bar.
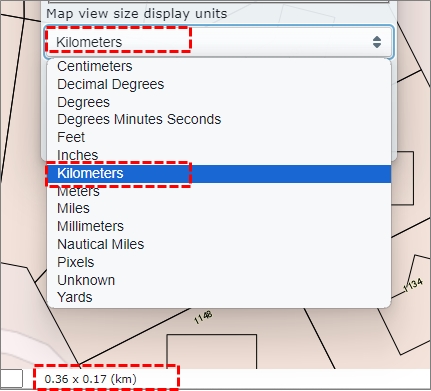
Fig: Context Menu Viewer Options Display Units