User Administration
The User Administration icon![]() is located on the top right-hand side of the screen and simply allows the administrator to manage the users/groups within enlighten, and management of permissions and functions.
is located on the top right-hand side of the screen and simply allows the administrator to manage the users/groups within enlighten, and management of permissions and functions.
Purpose of User Administration
The user administration functionality allows the user to carry out an array of functions regarding the user access and permissions. The administrator can add, edit and delete users/groups, assigning layers, manage redline layers, manage functionality and Show Info form columns.
The User Administration functions are arranged in the following groups:
- Populate LDAP Users: Populate LDAP users into enlighten.
- Manage User and Permissions: Assign layer viewing and function permissions to user groups and users.
- Integration Defaults: Assign default integration functions to user groups and users.
 Populate LDAP Users
Lightweight Directory Access Protocol (LDAP), is a client-server protocol for accessing directory services. In this instance, LDAP essentially allows the users to log in to enlighten by using their local domain windows credentials, as opposed to specific enlighten login details.
This is an ease of convenience method/tool which is beneficial to the organization in many ways, as the users would not have to remember/note many different credentials.
The Populate LDAP Users option therefore essentially enables the administrator to populate a list of users, who have enabled the LDAP login method.
For detailed information on enabling and setting up LDAP please refer to Advanced Authentication Settings.
To populate LDAP users the following steps can be followed:
- Navigate to Admin View > User Administration > Populate LDAP Users.
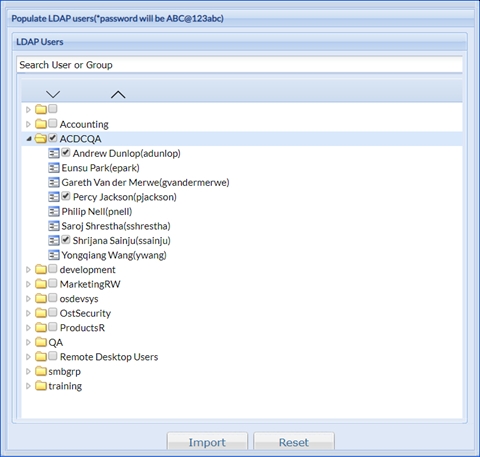
Fig: Populate LDAP Users - Select a User or Group to import from LDAP
Multiple users and groups can be populated at the same time. Only users and groups which were not populated into enlighten will have a check-box.
- Click Import to populate LDAP users and groups into enlighten.
Should there be any errors while importing LDAP Groups or User the relevant Group/s or User/s will be displayed in red text.
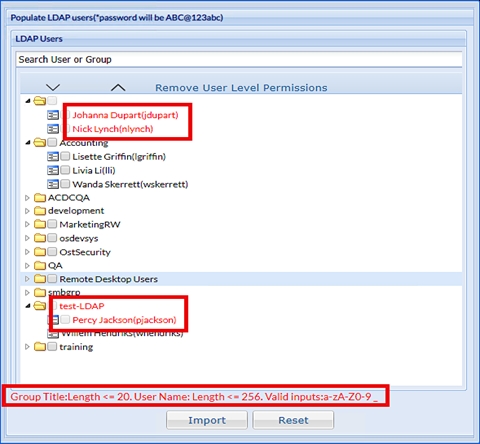
Fig: LDAP Import ErrorsTo get more detailed information regarding which Groups or Users was not imported due to errors please refer to the enlighten.log file.
Users not linked to a group will be imported/added to the EnlightenGroup when importing LDAP users.
 Manage Users and Permissions
The Manage Users & Permissions function allows the management of Users, Groups, Layers, Redline Layers, Functions and Show Info form Columns.
Manage User & Permissions can be broken down into the following groups:
Permissions Management
The enlighten Administrator have the option to manage user level permissions for individuals within any group throughout Users, Groups, Layers, Redline Layers, Functions, and Show Info form Columns. This function helps to maintain a level of security within the organization by limiting the permissions of users.
Permissions are classified into the various groups, if the user clicks on the Green “All” function then it will automatically collapse all the permissions into their groups. If it is clicked again then it will expand all the groups.
Remove User Level Permissions
The enlighten Administrator can remove individual user level permissions on (Layers, Redline Layers, Functions and Show Info form Columns), and in doing so, simultaneously ensuring the individual users inherit the overall Group permissions.
To Assign layers to groups or users the following steps can be followed:
- Navigate to Admin View > User Administration > Manage Users & Permissions > Layers.
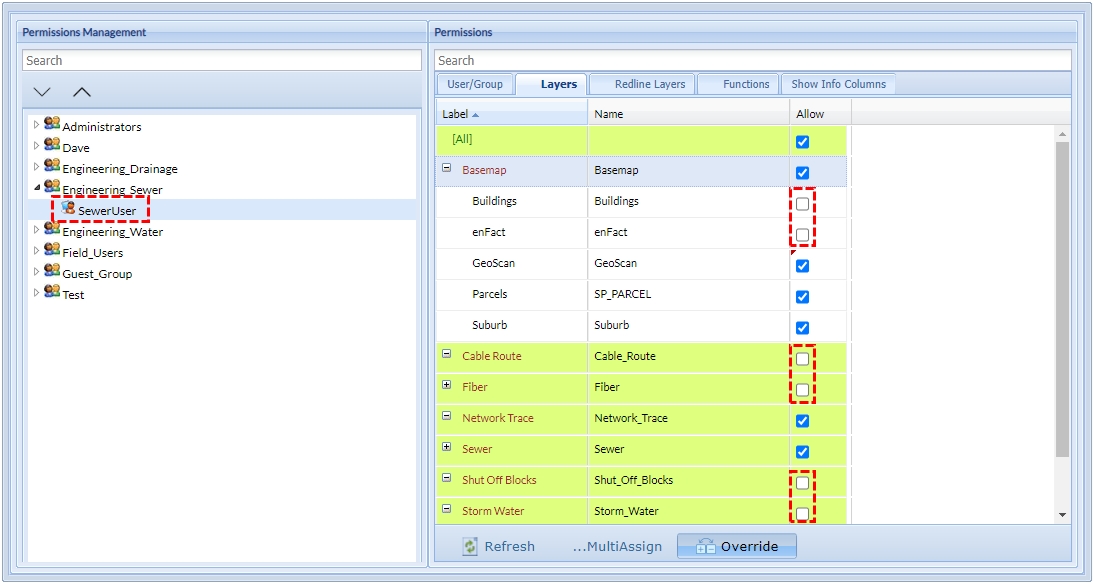
Fig: Remove User Level Permissions - Select the User Group or User, in which the user level permissions need to be removed.
- Click on the Remove User Level Permissions button to remove the permissions.
Individual user permissions have been revoked and now the Users will inherit permissions from the User Group.
Refresh
This option will clear the selections on the current map view and restore the page back to default. It simply allows the administrator to clear unsaved changes.
MultiAssign
The MultiAssign option allows the enlighten administrator to assign multiple layers to multiple users from different groups simultaneously, as opposed to doing each user individually, saving the administrator time.
To MultiAssign layers to groups or users the following steps can be followed:
- Navigate to Admin View > User Administration > Manage Users & Permissions > Layers.
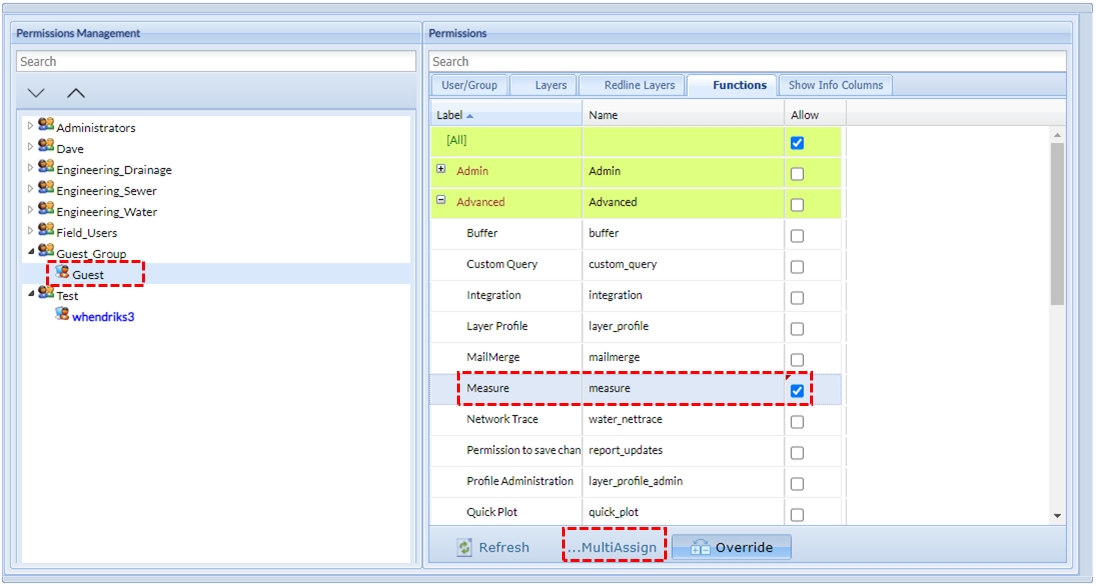
Fig: MultiAssign Layers - Select the layer Name of one of the layers to add in the Name column so that the row is selected and highlighted.
- Select the layers and/or layer groups to be assigned by ticking the checkbox next to the layer or layer group names.
- To assign the layers and/or layer groups to multiple users click the MultiAssign button.
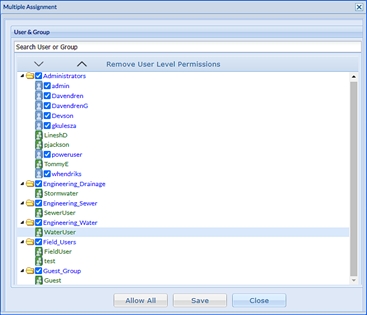
Fig: Multiple Assignment - Select the users and/or user groups to be assigned by ticking the checkbox next to the user or user group names.
- To save the multiple assignments click the Save button.
- Save the permissions by selecting the Save option on the top right corner of the Permissions Management interface.
If the user clicks on the Allow All button at the bottom of the dialog, then all users and groups will be ticked on.
Override
Because of the inherited permissions function where the user's permissions are inherited from assigning permissions to the group in which they belong as apposed to assigning the permissions directly to the user, for a user to be assigned an additional layer within a layer group, the administrator needs to perform the Override function to grant more individual permissions at the user level.
Users with override permissions will be displayed in blue text within the Groups. The Override button will only be selectable for users with override permissions.
To override the inheritance function, the following steps can be followed:
- Navigate to Admin View > User Administration > Manage Users & Permissions > Layers.
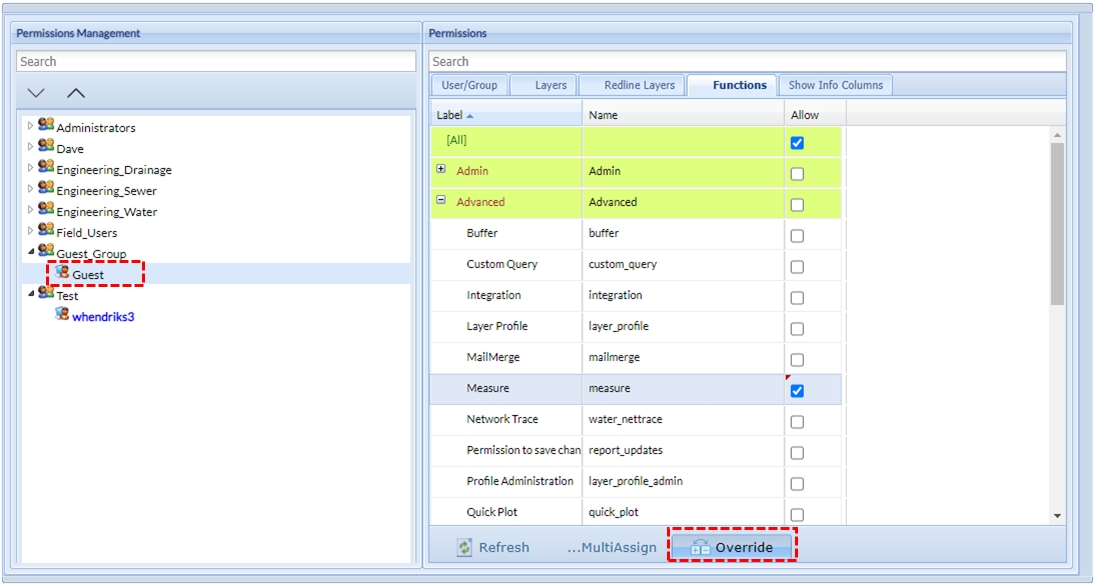
Fig: Override Layer Permissions - Select the group in the Permissions Management tree view to which the user belongs to.
- Select the user that needs to be deleted within the group.
- To override inheritance functions, click the Override button.
- Select the layers and/or layer groups to be assigned by ticking the checkbox next to the layer or layer group names.
- Save the permissions by selecting the Save option on the top right corner of the Permissions Management interface.
Groups
The Groups section is separated into two parts:
- Permissions Management
- Permissions
The Permissions Management consists of the various users classified within different user groups, whereas the Permissions consists of the group's detailed information.
Add a group
To add a new group the following steps can be followed:
- Navigate to Admin View > User Administration > Manage Users & Permissions > User/Group.
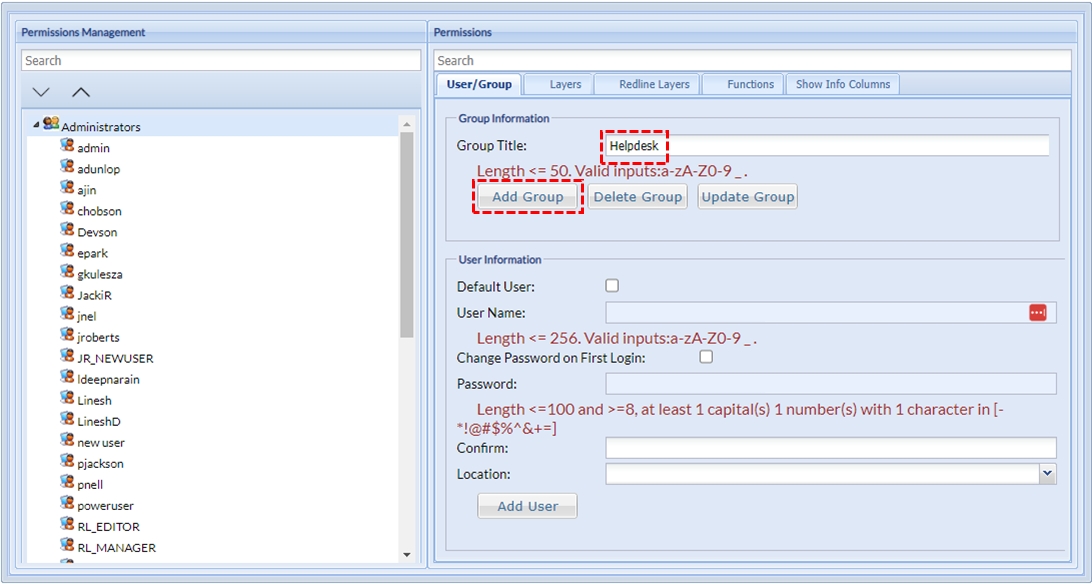
Fig: Add Group - Enter a title that uniquely identifies the group in the Group Title text box.
- Click the Add Group button to add the new group.
Edit a group
To edit a group the following steps can be followed:
- Navigate to Admin View > User Administration > Manage Users & Permissions > User/Group.
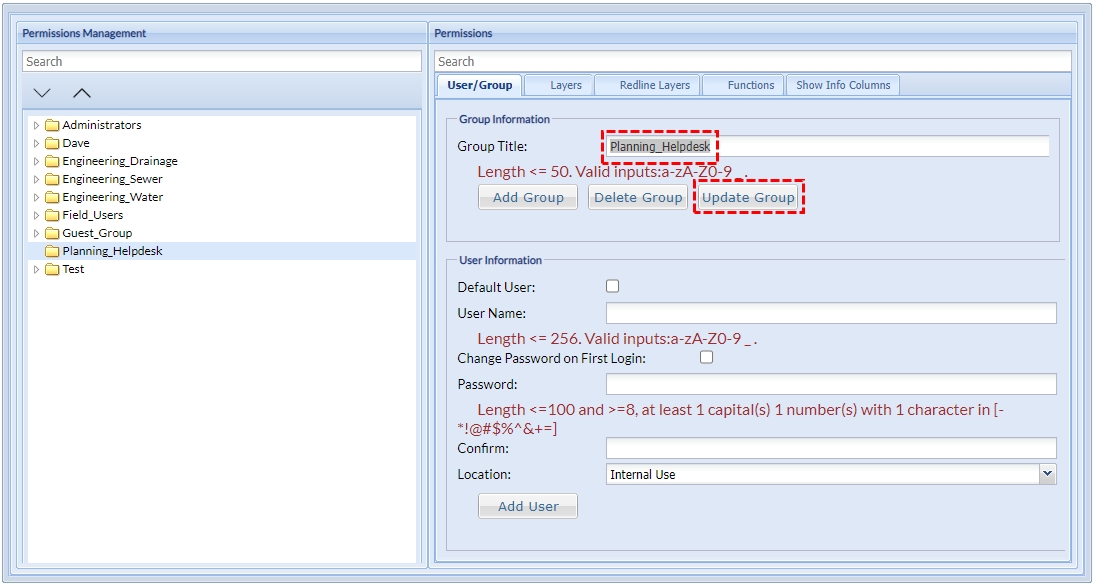
Fig: Edit a Group - Select the group in the Permissions Management tree view.
- Edit the group and click the Update Group button.
Delete a group
To delete a group the following steps can be followed:
- Navigate to Admin View > User Administration > Manage Users & Permissions > User/Group.
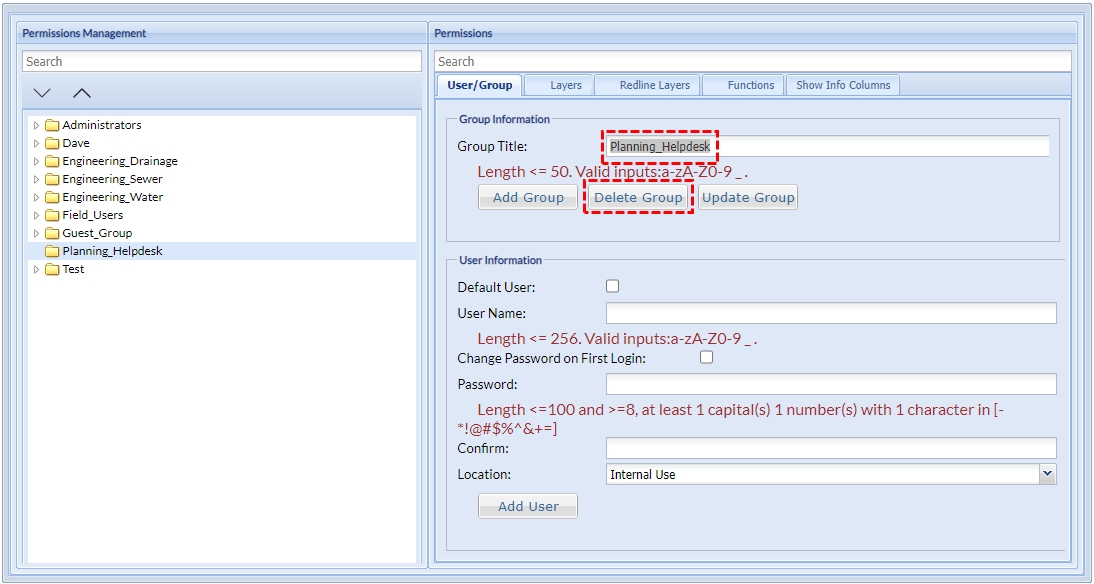
Fig: Delete a Group - Select the group in the Permissions Management tree view.
- Click the Delete Group button to delete the group.
Users
The Users section is separated into two parts:
- Permissions Management
- Permissions
The Permissions Management consists of the various users classified within different user groups, whereas the Permissions consists of the group's detailed information.
Add a User
To add a new user the following steps can be followed:
- Navigate to Admin View > User Administration > Manage Users & Permissions > User/Group.
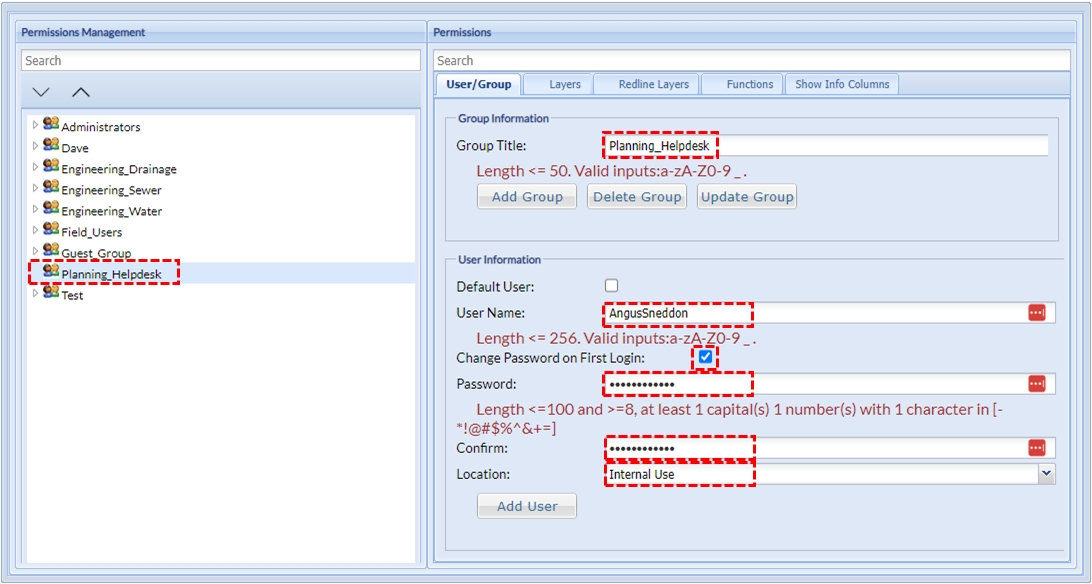
Fig: Add User - Select the Permissions Management tree view to which the new user will belong.
- Define the User Information:
- Default User: The login prompt will display this user name as the default login user name.
- Disclaimer: The user will see the disclaimer when logging in.
- Enter a user name that uniquely identifies the user in the User Name text box.
Note: A User Name cannot exceed 256 characters. - Check the Change Password on First Login check-box to allow the user to change his password when logging in for the first time.
- Enter a password which complies with the password standards in the Password text box.
- Confirm the password by re typing it in the Confirm text box.
- Define the user's Location. This determines the functionalities the users would be allowed based on the Internal or External specification. For further information refer to Security Settings and the parameters defined under Hardening.
- Internal Use: All functionality will be available to internal user's however; user input will now be sanitized. The system tests for sequences that may indicate a potential injection attack and will sanitize these.
- External Use: External users will only have access to hardened modules (Searches, enPlot, Navigation Tools, Show Info and Spatial Summary). Even if an administrator assigns an unhardened module to an external user, the user will not be able to utilize this module. Administrators should take care not to assign unhardened functions to external users as this may cause confusion among users.
- Touch Device: A touch device will use the same principals as Internal Use and External Use. The user will also automatically be assigned large icons in the enlighten toolbar to accommodate the icon displays on touch devices.
- When a new user is added, they will automatically inherit the layers and functions assigned to their group.
Edit a User
To edit a user the following steps can be followed:
Click the Update User button to save the changes to the user.
- Navigate to Admin View > User Administration > Manage Users & Permissions > User/Group.
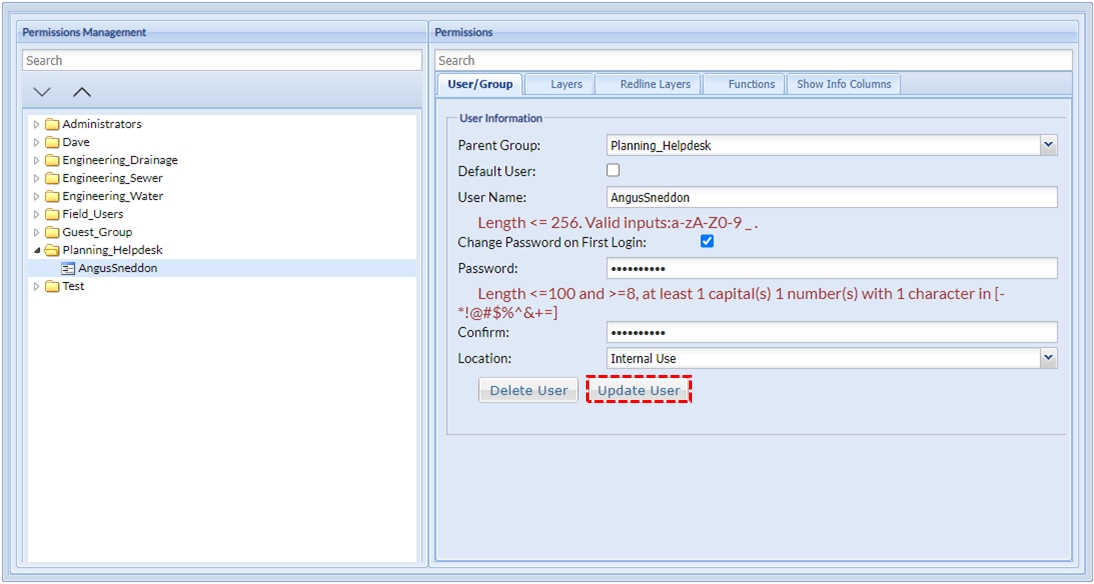
Fig: Edit User - Select the group in the Permissions Management tree view to which the user belongs to.
- Select the user that needs to be edited within the group.
- Click the Update User button to save the changes to the user.
Delete a User
To delete a user the following steps can be followed:
Click the Delete User button to delete the user.
- Navigate to Admin View > User Administration > Manage Users & Permissions > User/Group.
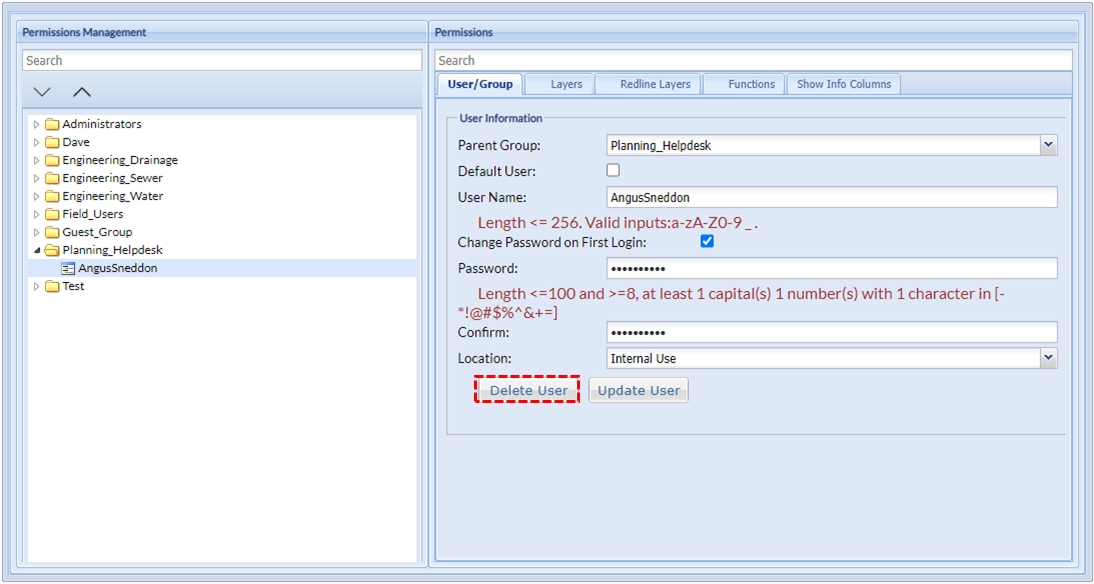
Fig: Delete User - Select the group in the Permissions Management tree view to which the user belongs to.
- Select the user that needs to be deleted within the group.
- Click the Delete User button to delete the user.
Layers
The Layers tab allows assigning permission to view layers to different users or user groups.
The Layers section is separated into two parts, Permissions Management, and Permissions.
The Permissions Management consists of the various users classified within different user groups, whereas the Permissions consists of the layers classified within respective layer groups.
To assign a layer to a user the following steps can be followed:
- Navigate to Admin View > User Administration > Manage Users & Permissions > Layers.
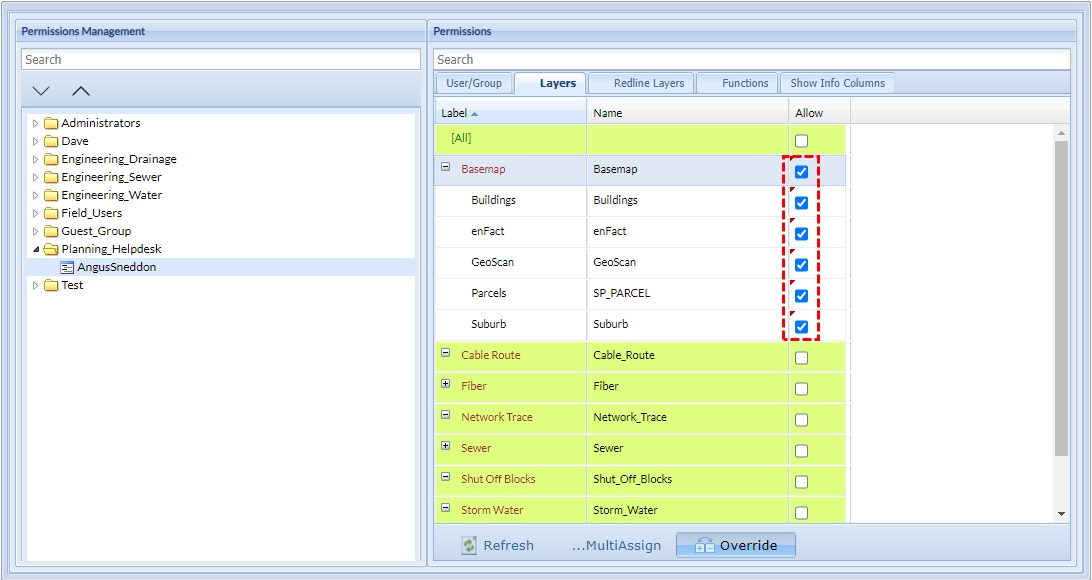
Fig: Layer Permissions - Select the group in the Permissions Management tree view to which the user belongs to.
- Select the user to assign layers to within the group.
- Select the Name of the layer in the Name column to add so that the row is selected and highlighted.
- Tick the Allow checkbox next to one or more Layers or Groups to assign permissions to.
- Click the Save button in the top right corner to save the layer permissions.
Please see Override for more information on the Override function.
Redline Layer Options
The Redline Layers tab allows the administrator to assign redline layers to the various groups/users.
The Redline Layers section is separated into two parts, Permissions Management, and Permissions. The Permissions Management consists of the various users classified within different user groups, whereas the Permissions consists of the redline layers classified within respective redline layer groups.
To assign redline layers to users and/or user groups the following steps can be followed:
- Navigate to Admin View > User Administration > Manage Users & Permissions > Redline Layers.
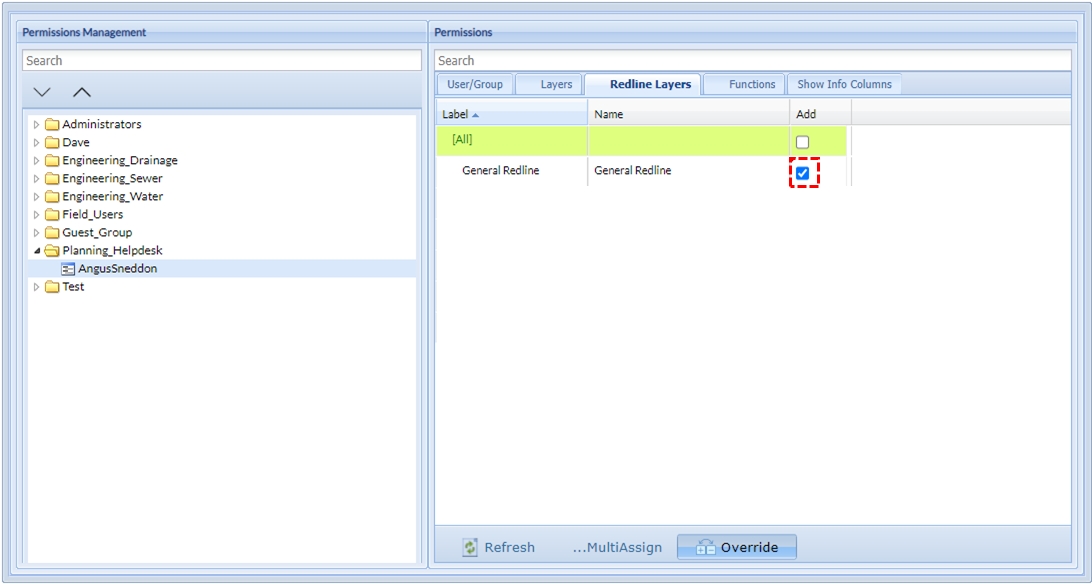
Fig: Assign Reline Layer Permissions - Select the user and/or user group in the Permissions Management tree view to assign redline layers to.
- Select the layers and/or layer groups to be assigned by ticking the checkbox next to the layer or layer group names.
- Save the permissions by selecting the Save option on the top right corner of the Permissions Management interface.
The enlighten administrator can assign individual layers from the layer groups to users or alternatively select an entire layer group and assign that to the users.
To Multi Assign Redline Layers or Redline Layer groups please refer to MultiAssign.
To Override the Redline Layer group inheritance function for a user please refer to Override.
Functions
The Functions tab allows assigning permissions to view system functions to users/groups.
The Functions section is separated into two parts, Permissions Management, and Permissions. The Permissions Management consists of the various users classified within different user groups, whereas the Permissions consists of the functions classified within respective functions groups.
Some of the toolbar functions found on the Enlighten and Advanced toolbars must be assigned to the users before they appear for selection on the toolbars. The assignment is done by the Administrator by assigning the required Function to selected user groups or individual users. The toolbar functions below form part of the Functions assigned to specific users or user groups.
- Buffer.
- Custom Query.
- Integration.
- Layer Profile.
- Mail Merge.
- Measure.
- Network Trace.
- Quick Plot.
- Shut-off Report.
- Stop Predicates.
- Theme Layer.
- Layer Profiles.
- Manage Reports.
To assign functions to users and/or user groups the following steps can be followed:
- Navigate to Admin View > User Administration > Manage Users & Permissions > Functions.
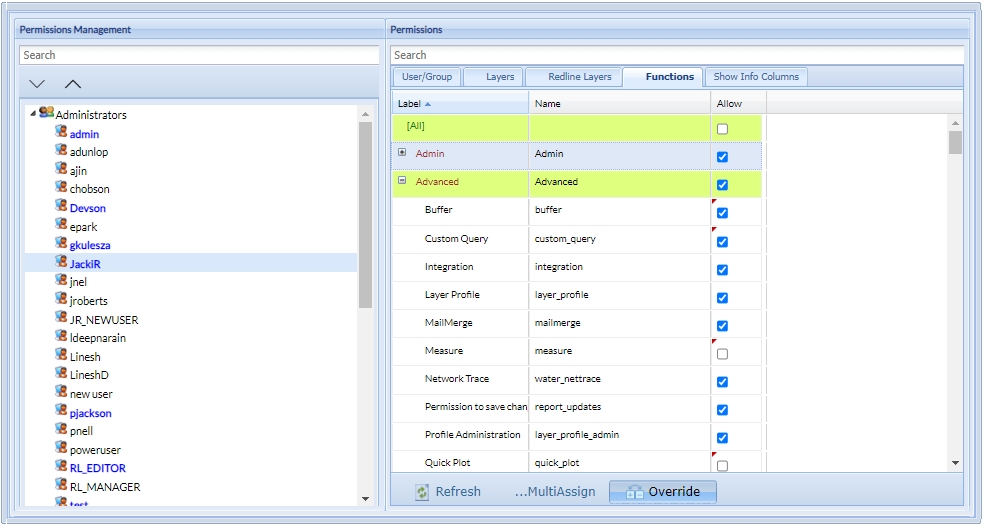
Fig: Assign Functions Permissions - Select the user and/or user group in the Permissions Management tree view to assign functions to.
- Select the layers and/or layer groups to be assigned by ticking the checkbox next to the layer or layer group names.
- Save the permissions by selecting the Save option on the top right corner of the Permissions Management interface.
The enlighten administrator can assign individual layers from the layer groups to users or alternatively select an entire layer group and assign that to the users.
To Multi Assign Functions or Function groups please refer to MultiAssign.
To Override the Functions group inheritance function for a user please refer to Override.
For a comprehensive explanation about the functions within this tab please refer to List of Functions Explained.
Show Info Columns
Show Info forms are used to view detailed information about items selected in the map view. Show Info forms contain attribute information which is sometimes subject to change based on certain conditions.
The Show Info form Columns section is separated into two parts:
- Permissions Management
- Permissions
The Permissions Management consists of the various users classified within different user groups, whereas the Permissions consists of the Show Info classified within respective Show Info groups.
To allow editing to users and/or user groups the following steps can be followed:
- Navigate to Admin View > User Administration > Manage Users & Permissions > Functions.
- Select the relevant data source from the Data Source drop-down list.
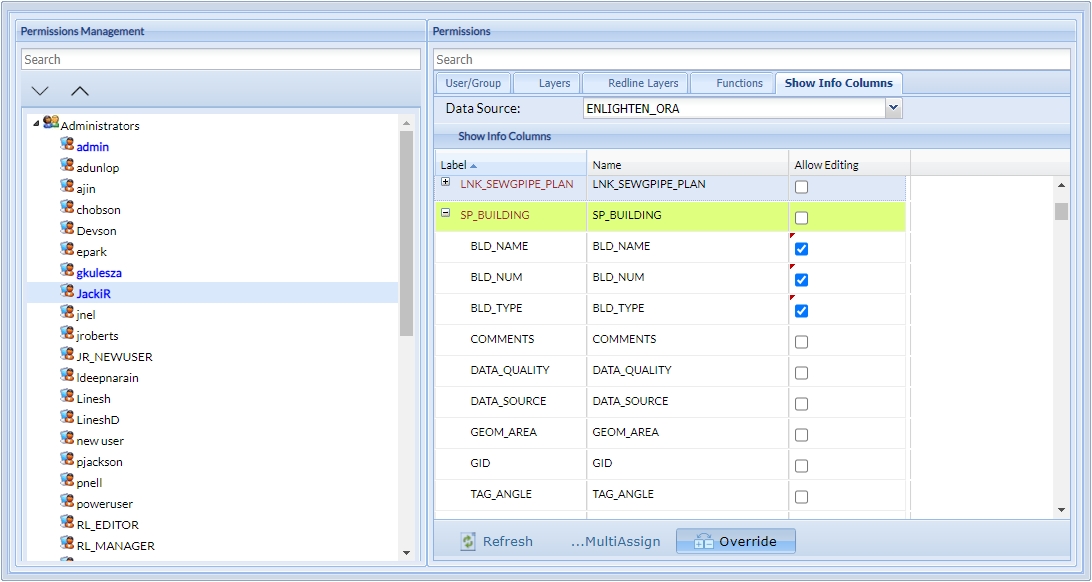
Fig: Assign Show Info Columns Permissions - Select the user and/or user group in the Permissions Management tree view to allow editing on specified columns.
- Select the column or columns which can be edited by ticking the checkbox in the Allow Editing adjacent to the Column name they are permitted to edit.
- Save the editing permissions by selecting the Save option on the top right corner of the Permissions Management interface.
The enlighten administrator can assign individual functions from the functions groups to users or alternatively select an entire function group and assign that to the users.
To Multi Assign Show Info Columns or Show Info Columns groups please refer to MultiAssign.
To Override the Show Info Columns group inheritance function for a user please refer to Override.
 Integration Defaults
A user can choose to have a specific function launched through the Integration tool when selecting objects belonging to the same layer, for more detail please refer to Integration.
To assign default integration functions the following steps can be followed:
- Navigate to Admin View > User Administration > Integration Defaults.
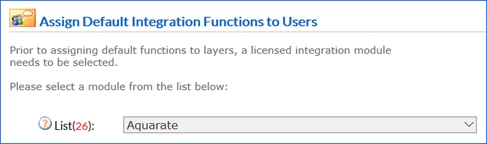
Fig: Assign Default Integrations to Users - Select an integration module from the List drop-down menu.
The Default Integration Functions set up page is composed of three sections:
- System User Account lists the users and user groups.
- Layers and Functions list the different layers and functions.
- Links allows Reloading Information and Saving Information.
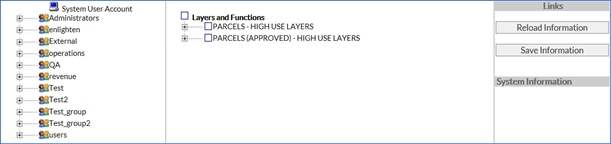
Fig: Assigning functions to users
- Select the user from the System User Account tree view.
- To assign a single, or multiple functions tick the checkbox in the Layers and Functions tree view.
- Save the integration functions by clicking the Save Information button in the Links view.
Log Administration
The Log Administration section allows the administrator to view and delete the User and Administrator Log files generated by enlighten.
The Log Administration section is composed of:
- View User Log: View all details of User action log information.
- Delete User Log: Delete User action log information.
- View Admin Log: View all details of Administration log information
- Delete Admin Log: Delete Admin action log information.
- View enlighten Log: View enlighten log information generated by log4net.
 View User Log
This allows the administrator to view a log file showing all details of user action.
To view the user log files the following steps can be followed:
- Navigate to Admin View > Log Administration > View User Log.
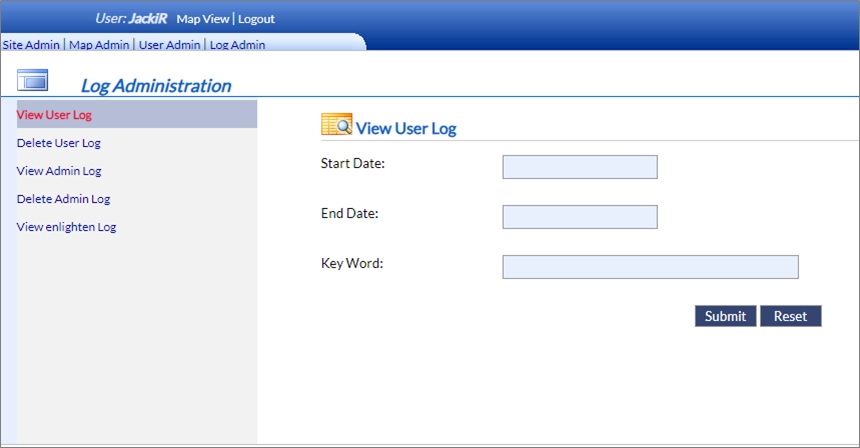
Fig: Filter View User Log - Define the user log file filter:
- Start Date & End Date: The log query will return all logs found between the Start Date and End Date specified by the administrator.
Note: You are only permitted to select one default function per layer. - Keyword: This is an optional field that allows filtering the log files by a key word.
- Start Date & End Date: The log query will return all logs found between the Start Date and End Date specified by the administrator.
- Click on the Submit link to view the user log files.
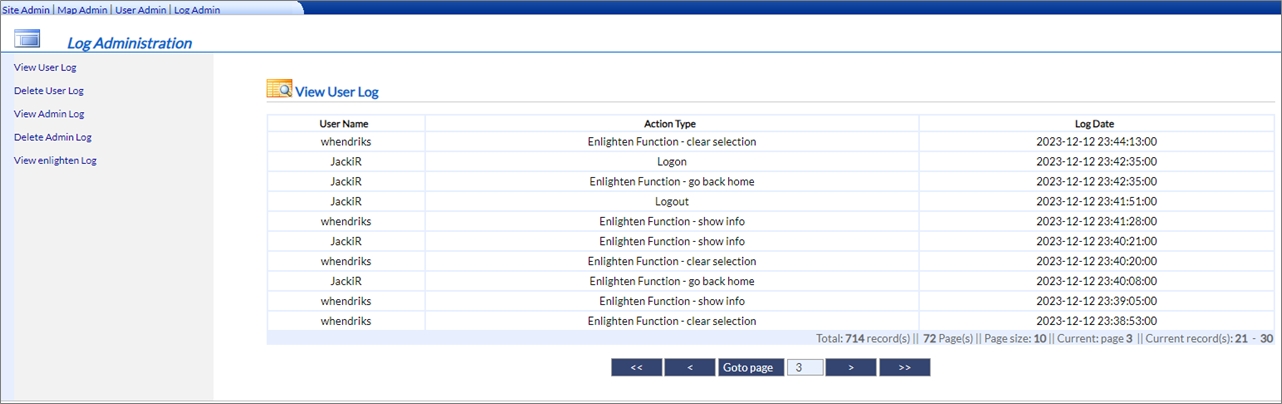
Fig: View User Log - Select a user from the User Name list to view the log file.
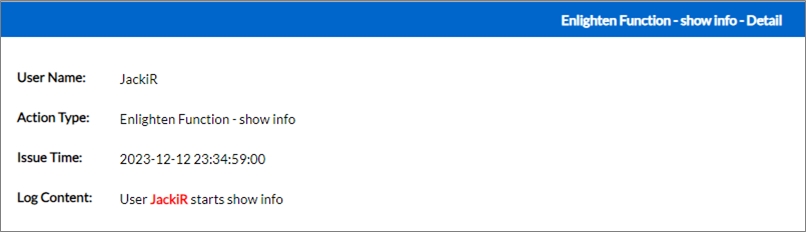
Fig: Log Detail
Delete User Log
To delete user log files the following steps can be followed:
- Navigate to Admin View > Log Administration > Delete User Log.
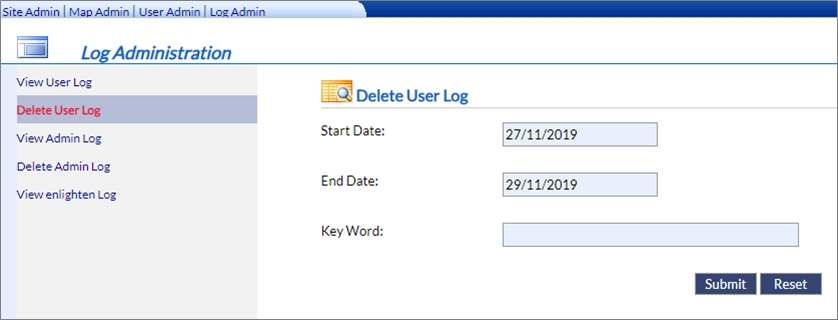
Fig: Filter Delete User Log - Define the delete user log file filter:
- Start Date & End Date: The log query will return all logs found between the Start Date and End Date specified by the administrator.
Note: If editing the date manually please ensure it is in the same format as the date generated by the calendar. - Keyword: This is an optional field that allows filtering the log files by a key word.
- Start Date & End Date: The log query will return all logs found between the Start Date and End Date specified by the administrator.
- Click on the Submit link to view the user log files.
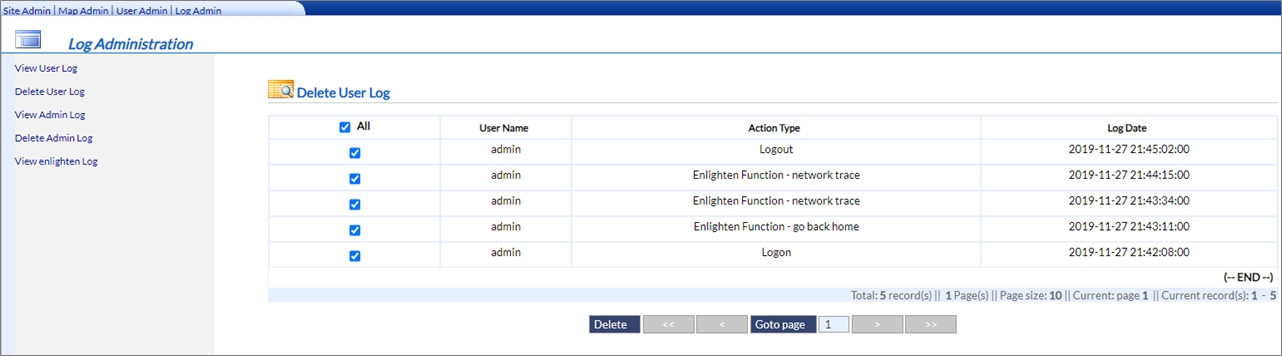
Fig: Delete User Log - Select a single or multiple log files by ticking the checkbox in the tree view.
- Click the Delete button to delete the selected log files.
View Admin Log
To view the administration log files the following steps can be followed:
- Navigate to Admin View > Log Administration > View Admin Log.
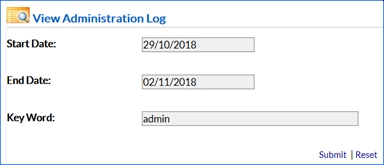
Fig: View Administration Log - Define the administration log file filter:
- Start Date & End Date: The log query will return all logs found between the Start Date and End Date specified by the administrator.
Note: If editing the date manually please ensure it is in the same format as the date generated by the calendar. - Keyword: This is an optional field that allows filtering the log files by a key word.
- Start Date & End Date: The log query will return all logs found between the Start Date and End Date specified by the administrator.
- Click on the Submit link to view the administration log files.
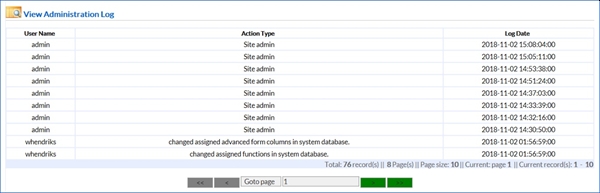
Fig: View Administration Log Details - Select a user from the User Name list to view the log file.

Fig: Log Detail
Delete Admin Log
To delete administration log files the following steps can be followed:
- Navigate to Admin View > Log Administration > Delete Admin Log.
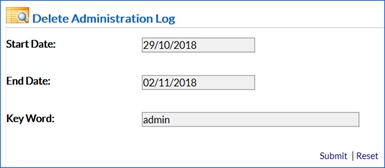
Fig: Filter Delete Administration Log - 2. Define the delete administration log file filter:
- Start Date & End Date: The log query will return all logs found between the Start Date and End Date specified by the administrator.
Note: If editing the date manually please ensure it is in the same format as the date generated by the calendar. - Keyword: This is an optional field that allows filtering the log files by a key word.
- Start Date & End Date: The log query will return all logs found between the Start Date and End Date specified by the administrator.
- Click on the Submit link to view the administration log files.
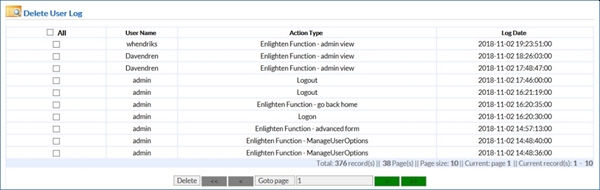
Fig: Delete User Log - Select a single or multiple log files by ticking the checkbox in the tree view.
- 5. Click the Delete button to delete the selected log files.
View enlighten Log
To view enlighten log files the following steps can be followed:
- Navigate to Admin View > Log Administration > View enlighten Log.
- Select a log file from the tree view which is defined by date and time.
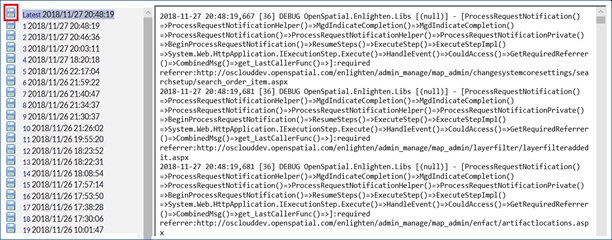
Fig: View enlighten Log - Click on the Save log file button to save the log file.