Map Site Administration
Numerous items are configurable in MapGuide Open Source (MGOS). This section will describe some basic features that can be used with enlighten.
- Layer Naming Conventions: Standard layer naming conventions.
- Map Symbol List: Creating a symbol list for layers.
- Context Menu: Create a right‐click menu over a map area.
- Adding a Layer in MapGuide Maestro: Creating and maintaining layers.
- Adding Groups and Layers to enlighten: Creating and maintaining groups.
- Theming a Layer in MapGuide Maestro: Layer Theming and maintenance.
- Changing Drawing Order in MapGuide Maestro: Arranging layer and group drawing order.
- Configure External Provider Background Image: Configuring External Provider images in Mapguide Maestro to use as background imagery.
Layer Naming Setup Instructions
Please ensure you adhere to the following rules when naming map layers for use within enlighten.
For names of layer group and layers:
- Begin with characters (not numbers).
- Characters: A, B, C... OR a, b, c ...
- Numbers: 0,1,2,3,4,5,6,7,8,9.
- Symbols: _ Only.
- Length: Maximum 100 characters.
- Do not give the same name to different layers and groups.
For labels of layer groups and layers:
- Begin with characters (not numbers).
- Characters: A, B, C... OR a, b, c ...
- Numbers: 0,1,2,3,4,5,6,7,8,9.
- Symbols: (, ), _, %, Space.
- Length: Maximum 100 characters.
Other:
- Check Allow access to map layer setup from API for every layer.
Map Symbol List
To insert symbols in the enlighten map, one or more symbols should first be added to a MapGuide Maestro Symbol Library. In symbol libraries, you can use Portable Network Graphics (PNG). Create your own symbols in AutoCAD Map 3D or another application and then import them into MapGuide Maestro.
To add a new symbol library in MapGuide Maestro the following steps can be followed:
- In MapGuide Maestro expand your site folder and right-click on the Symbols folder located in the Site Explorer tree view.
- Select New Resource from the menu.
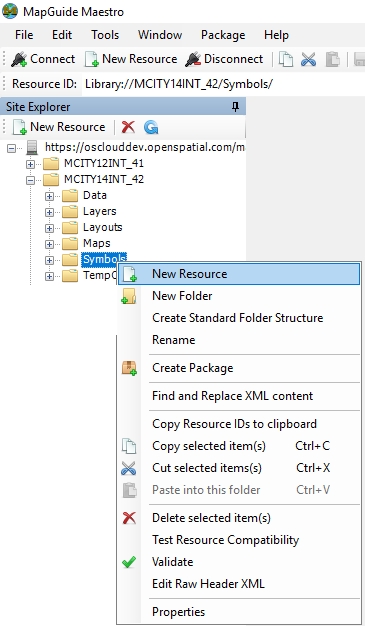
Fig: Create New Resource - Select Simple Symbol Definition from the Default selection.
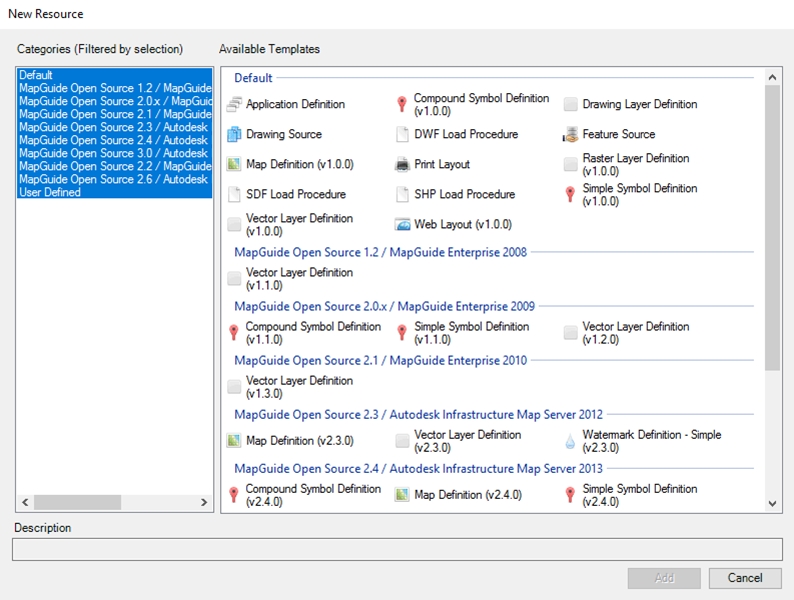
Fig: Simple Symbol DefinitionThis will open the New Resource window.
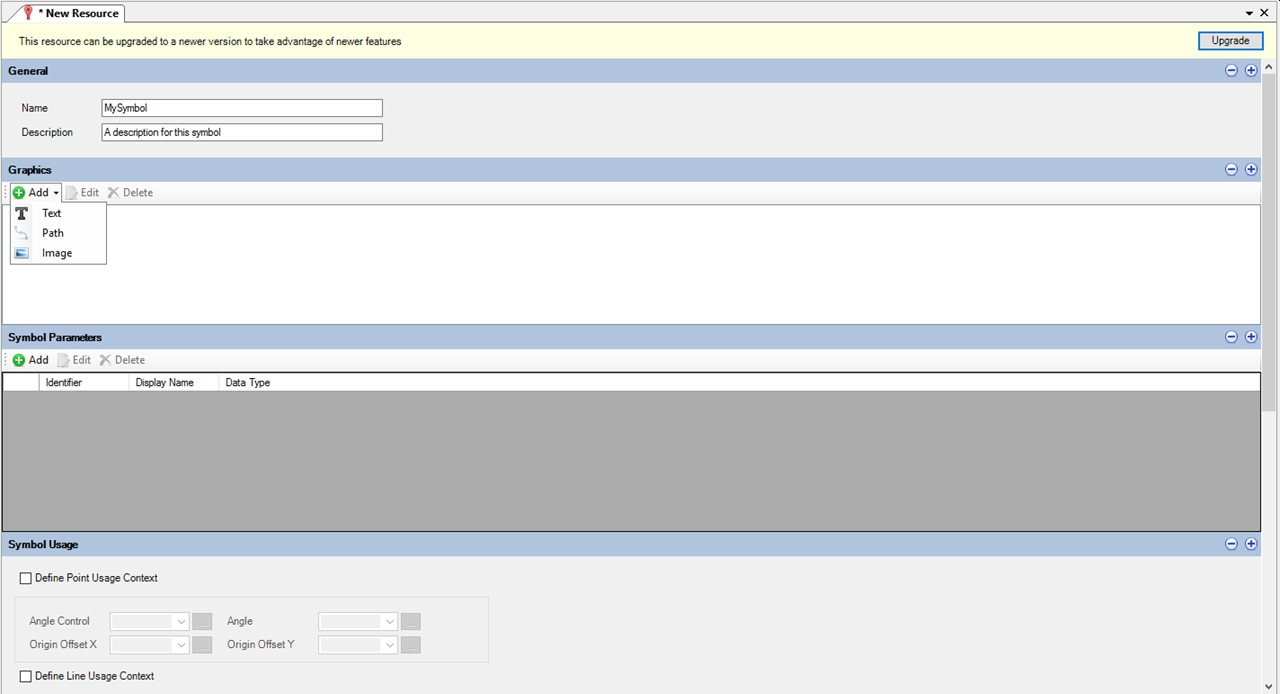
Fig: New Resource Symbol - Define the Symbol:
- Name: Enter a symbol name that uniquely identifies the symbol.
- Description: Enter a description that uniquely identifies the symbol.
- Define the Symbol Type:
- Text: Text Elements.
- Path: A Geometric Path.
- Image: PNG Images.
- Save the symbol by clicking the Save Resource button in the MapGuide Maestro toolbar.
To import Autodesk Infrastructure Studio (AIM) symbol libraries into MapGuide Open Source (MGOS ) please contact support@openspatial.com for more information.
Context Menu
The context menu is available when you right‐click over a map area. You can specify additional components to include or exclude in the right-click menu. This menu has been stripped down to 6 commands, namely:
- Load Geo-scan: Loads the scanned image as a back-drop on the layer Geo Scan Images for the selected Geo-scan boundary.
- Select Circle: When using the Select Circle option, the user is required to draw a circle around the objects of interest and the value of the circle's radius is displayed on the right-hand side task pane.
- Show Info: Allows the user to access the Show Info function.
- KML Download: Downloads a KML file consisting of the map selections.
- Refresh: Refreshes the map and reloads all layers, keeping the current center and scale.
- Options: The view options tab in the right-click popup menu opens a pane on the right-hand side of the screen giving the user the option of metric or imperial measurements.
To change the context menu order/layout in MapGuide Maestro the following steps can be followed:
- In MapGuide Maestro expand your site folder and double-click on the Web Layout located in the Site Explorer tree view.
Fig: Web Layout FileThis will open the Web Layout Editor.
- Select Menus and Toolbars in the web layout window.
- Select Context Menu in Menus and Toolbars.
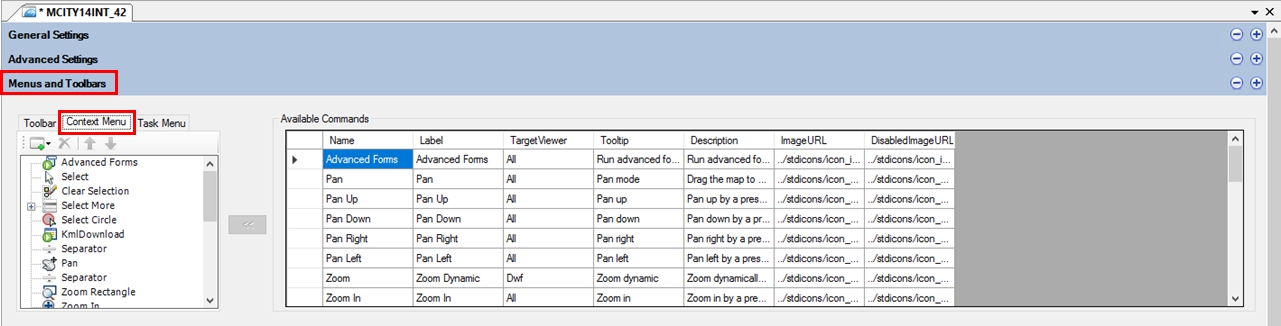
Fig: Context Menu - To customize the context menu simply drag and drop new commands.
- To remove, reorder or add items use the prompts in the context menu tool bar.
- Save the context menu by clicking the Save Resource button in the MapGuide Maestro toolbar.
Adding a Layer in MapGuide Maestro
To add a new layer in MapGuide Maestro the following steps can be followed:
- In MapGuide Maestro expand your site folder and right-click on the Layers folder located in the Site Explorer tree view.
- Select New Resource from the menu.
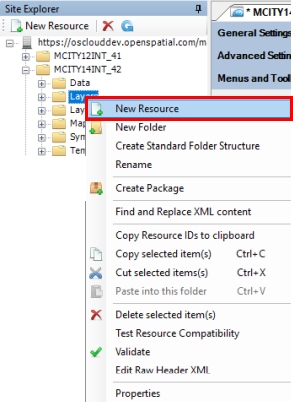
Fig: Adding a New LayerThis will open the New Resources screen where the user selects the Vector Layer Definition template, then selects the Add button to continue.
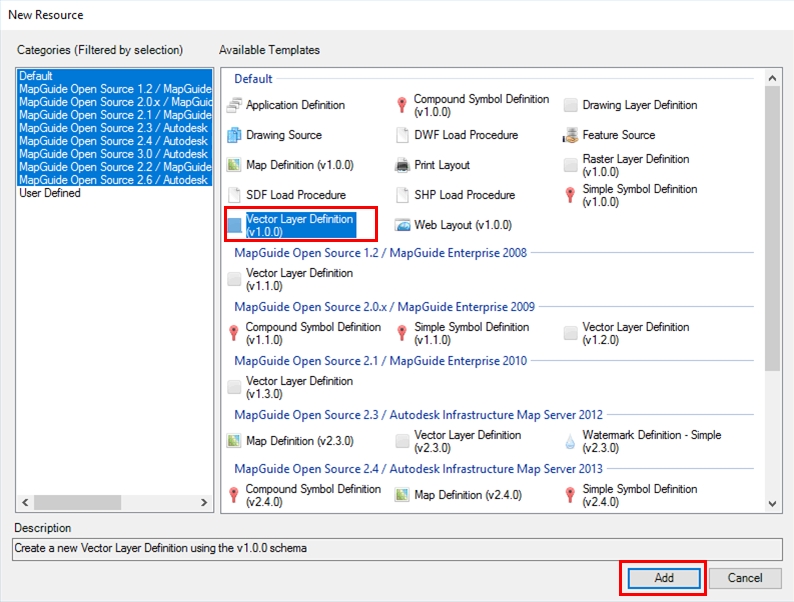
Fig: Add new Layer Resource - On the Select Resource dialog box, select the Data Folder in the Site Explorer tree view, then select the Resource from the list of available Resources so that the Name is populated, and then select the OK button to continue.
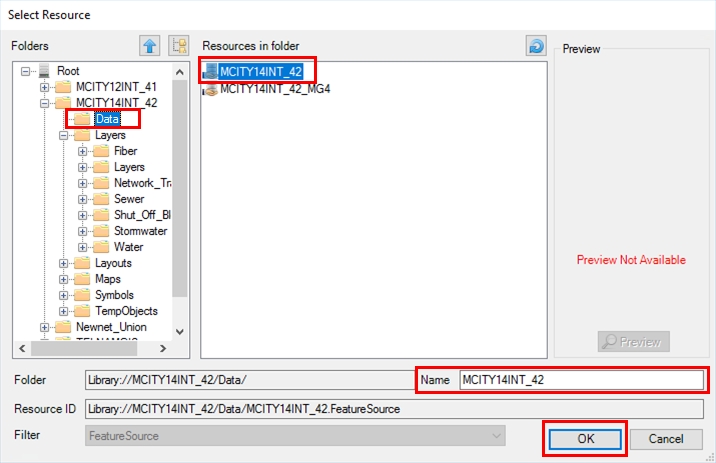
Fig: Select Resource from Resource list - On the New Resource screen, select the three dots ... at the end of the Feature Class to display a list of available Layer Resource items, select the item to be authored, and select the OK button to continue.
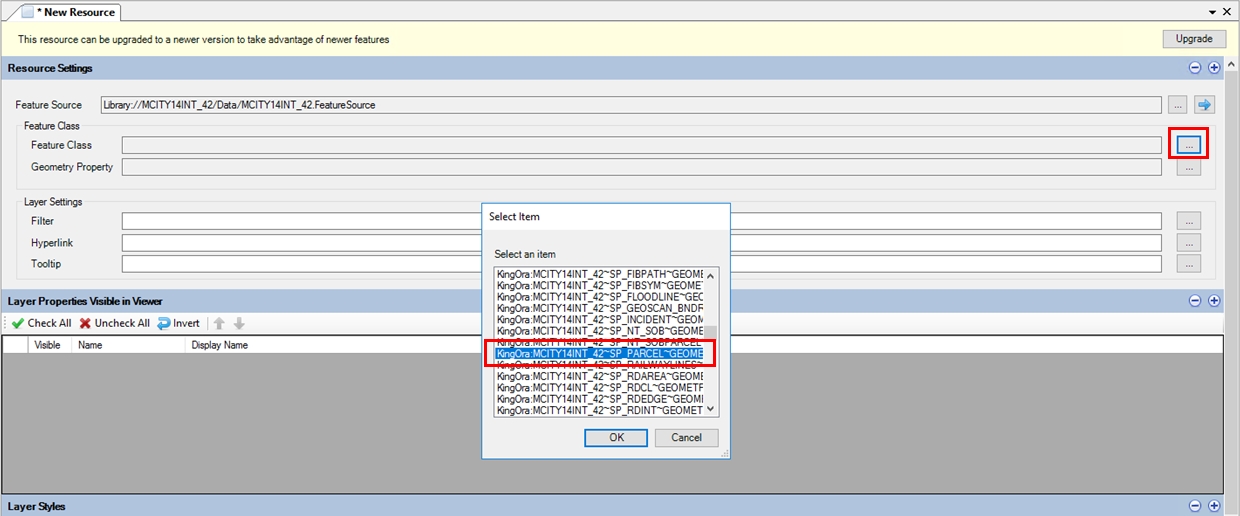
Fig: Select the Feature Class list of Layer Resource Items - Once the Feature Class is selected from the list the Geometry Property is updated from the selection.
- Select which Layer Properties you require visible in the viewer. If you want all properties to be visible, select the Check All button and all check-boxes will be ticked.
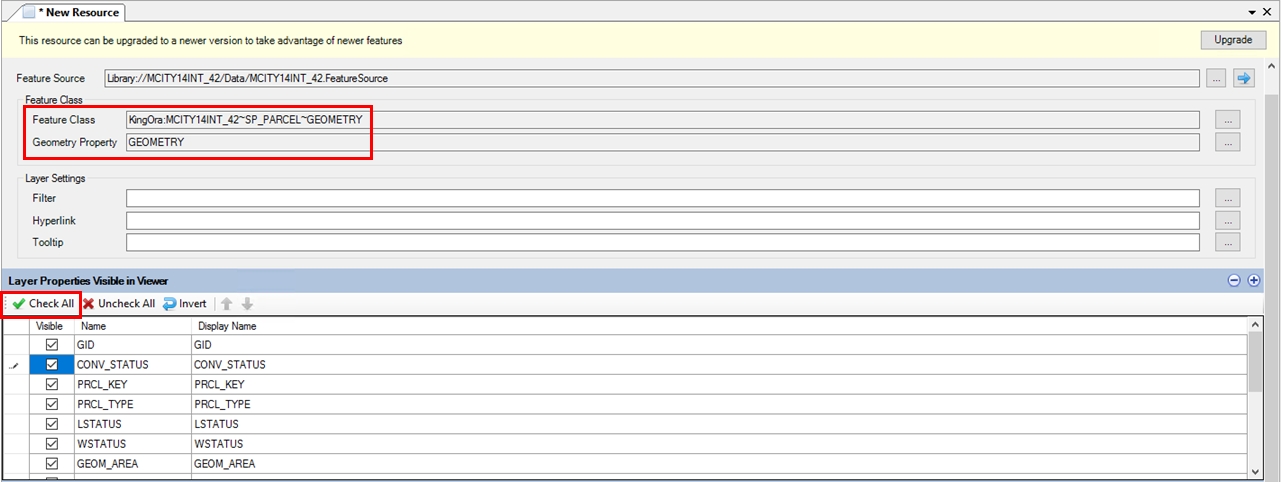
Fig: Select the Layer Properties to be visible in Viewer - Select how you want to style the layer in the Layer Styles section and set the following criteria:
- Set which style will correctly represent the object to be authored. Select either Points, Lines or Areas based on the following guidelines.
- Objects which have a single X;Y coordinate should be styled as POINT objects, e.g.: Town Name
- Objects which multiple coordinates should be styled as LINE objects, e.g.: River Line
- Objects which multiple coordinates which start and end at the same coordinate should be styled as AREA objects, e.g.: Lake
- Set the Scale Range you want the layer to be visible at e.g. Min Scale 0 and Max Scale 5000. This will display the object at a scale of between 0 to 5000 units.
- Set the Filter colour to apply to the object.
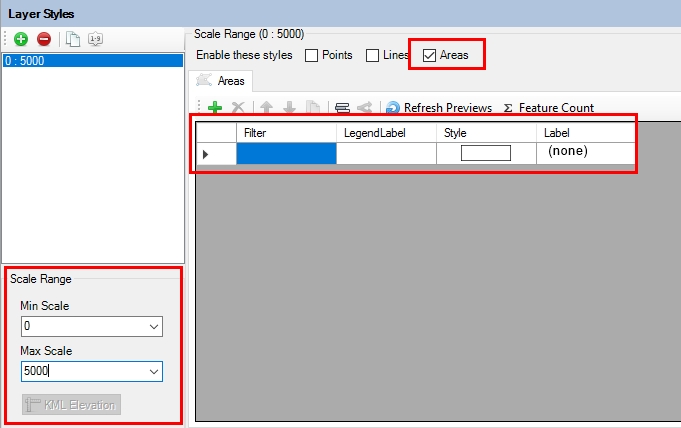
Fig: Set the Layer Styling - Set which style will correctly represent the object to be authored. Select either Points, Lines or Areas based on the following guidelines.
- Save the layer by clicking the Save Resource button in the MapGuide Maestro toolbar at the top of the screen.
This will open the Save Resource window where the user must first select the Layers folder from the Folders tree view, select the applicable Resource, then enter the layer Name that will appear in the map legend.
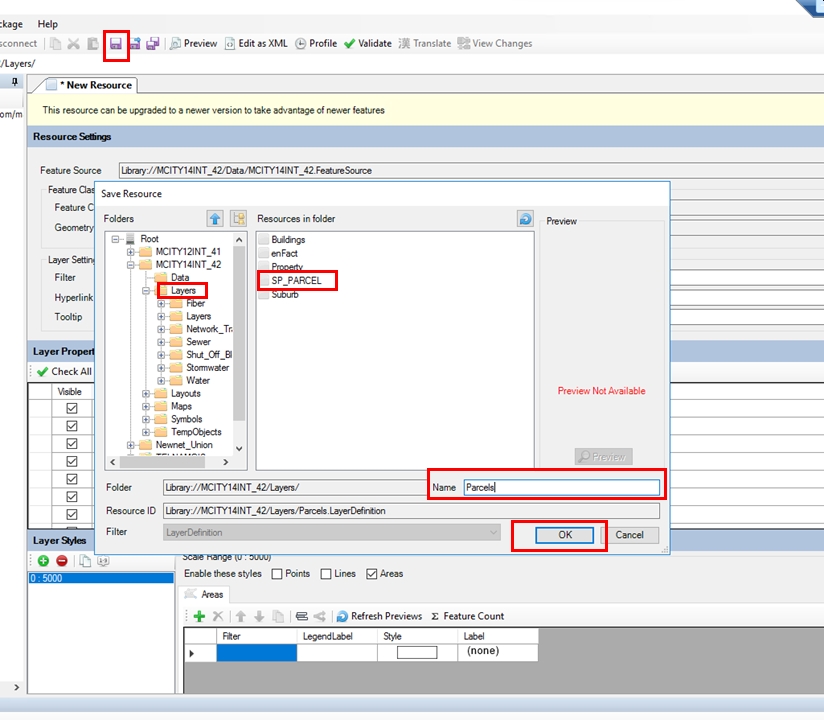
Fig: Save Layer Resource - Click the OK button to save the layer.
Adding a Hyperlink Tool-tip which opens Show Info pane
The purpose of tool-tips on a layer is to display certain attributes when your mouse pointer is over a feature without selecting the feature on the map. The tool-tips enhance the user’s experience of navigating the around the map and are implemented in the viewer as HTML div containers. With some knowledge of basic HTML some really useful and powerful tool-tips can be created.
To configure a hyperlink tool-tip which opens the Show Info pane, complete the following:
- In MapGuide Maestro expand your site folder and right-click on the Layers folder located in the Site Explorer tree view.
- Open the Parcel layer so that the Resource Settings is displayed.
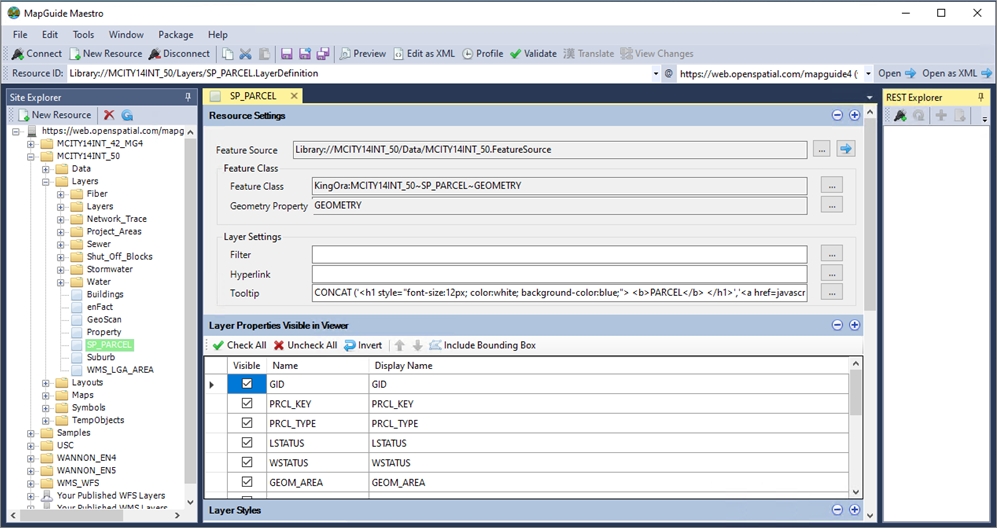
Fig: Navigate to Tool-tip text box - Navigate to the Tooltip text box in the Layer Settings section and enter the following syntax:

Fig: Enter Tool-tip syntax - Save the layer by clicking the Save Resource button in the MapGuide Maestro toolbar at the top of the screen.
- Open enlighten, turn on the Parcel layer, navigate to a parcel and hold the mouse over a parcel boundary.
The tool-tip will display with the Show Information as a hyperlink.
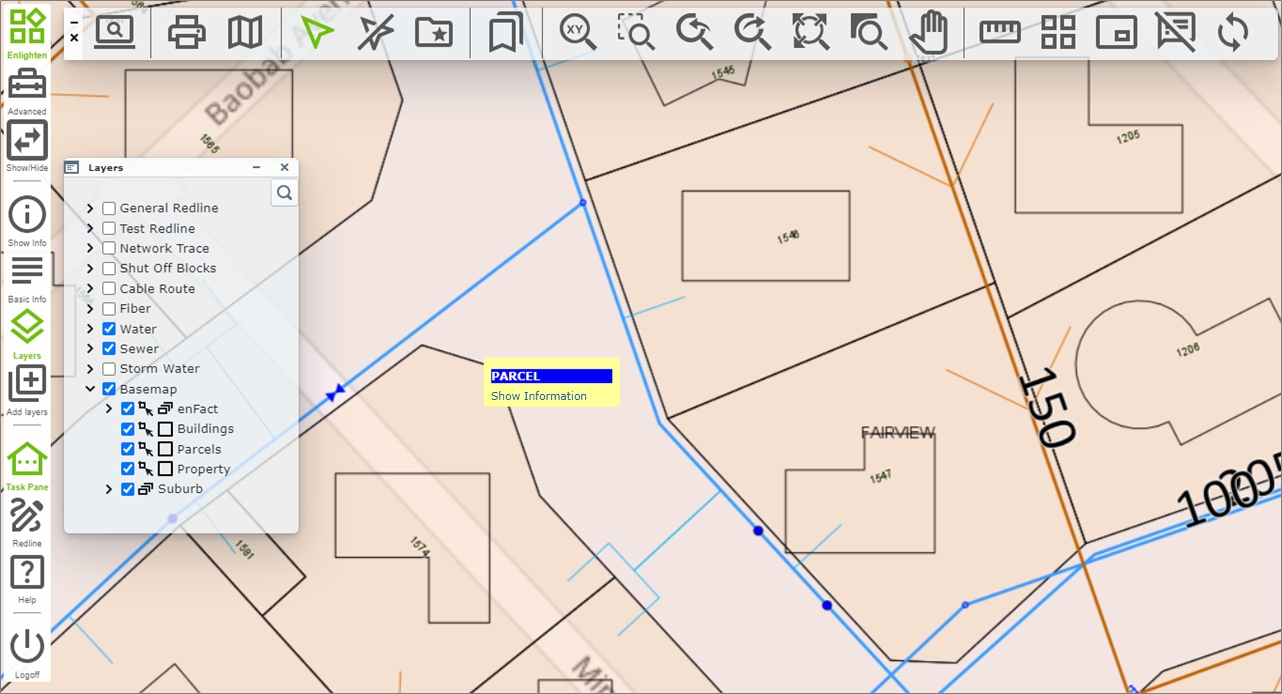
Fig: Show Information tool-tip in enlighten - When selecting the Show Information hyperlink, the parcel is highlighted on the map which is centered around the new selection. At the same time the Show Info pane is opened using the GID value of the parcel passed in the tool-tip.

Fig: Opening the Show Info pane from the tool-tip hyperlink
Adding Groups and Layers to enlighten
To visualize your data in enlighten it first needs to be added to the map definition file. Layers can be added individually or as groups.
IMPORTANT: When authoring layers and layer groups in MapGuide Maestro, it is important to ensure that each Layer Group label name is unique. Layer Groups using the same label name will break the sorting function in the Enlighten Administrator User Permissions pane.
To add a new group in MapGuide Maestro the following steps can be followed:
- In MapGuide Maestro expand your site folder and double-click on the Map Definition file located in the Site Explorer tree view.
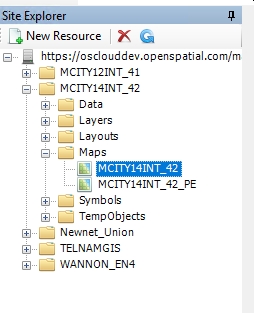
Fig: Map Definition FileThis will open the Map Settings screen.
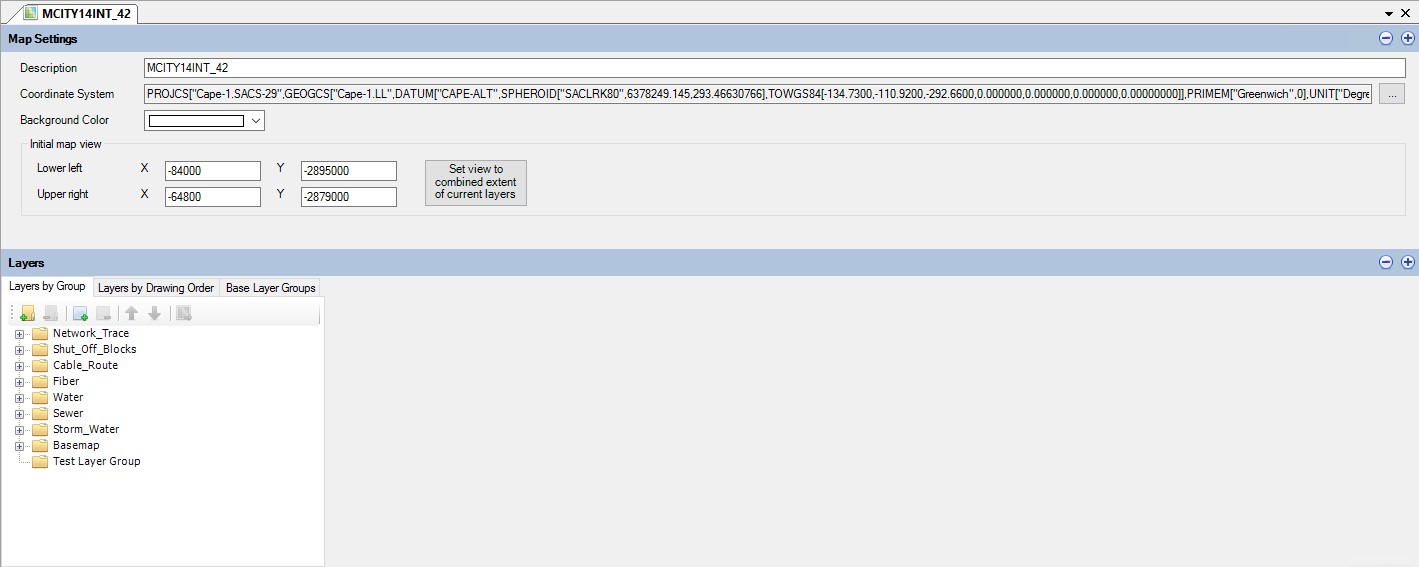
Fig: Map Settings - Select the Add a new Group button in the Layers by Group toolbar.
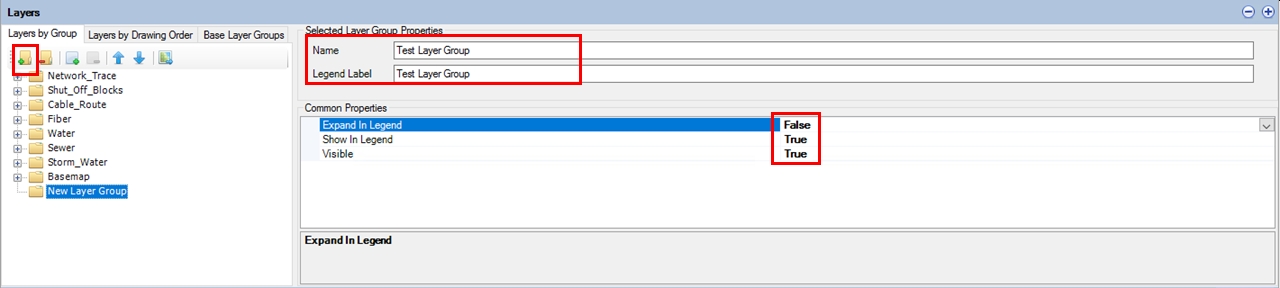
Fig: Add new Layer Group - Define the new group:
- Name: Enter a group name that uniquely identifies the group.
- Legend Label: Enter a description that uniquely identifies the group.
- Define the groups Common Properties:
- Expand in legend: Set to False.
- Show in Legend: Set to True.
- Visible: Set to True.
- Select the new group and select Add a new layer from the from the Layers by Group toolbar.
This will open the Select Resource window.
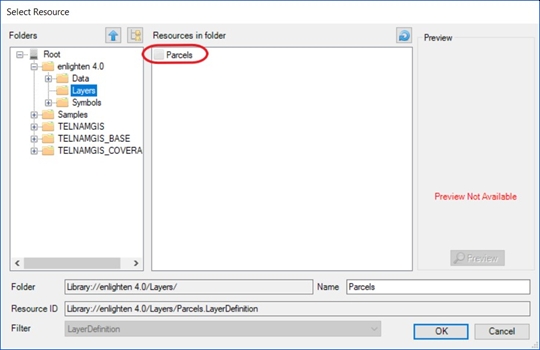
Fig: Select Resource - Select the Layers folder from the Folders tree view.
- Select the layer from the Resources in Folder view to include in the group.
- Click the OK button to add the layer to the group.
Theming a Layer in MapGuide Maestro
Once a layer has been created it can be customized in the layer editor.
To customize a layer in MapGuide Maestro the following steps can be followed:
- In MapGuide Maestro expand your site folder, expand the Layers folder and double-click on the layer you want to customize in the Site Explorer tree view.
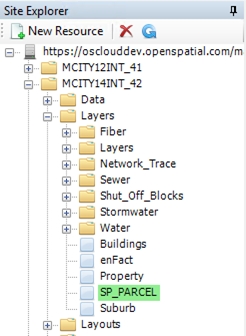
Fig: Layer FileThis will open the Layer Definition Editor.
- Select Layer Styles in the layer window.
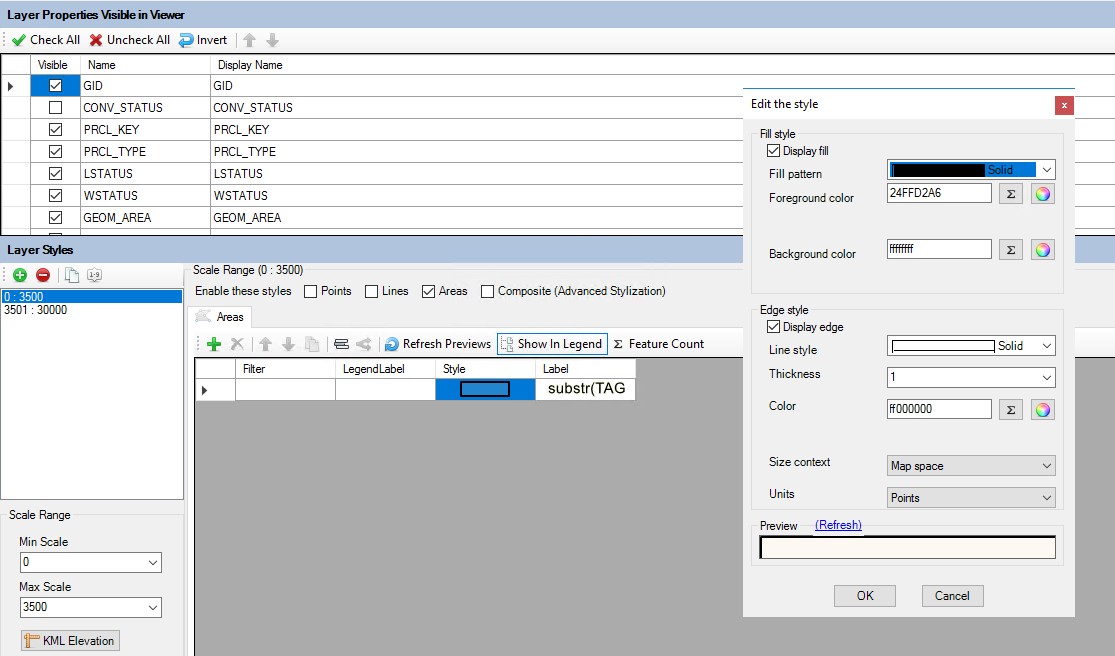
Fig: Layer Styles - Define the Layer Styles:
- Enable these styles (Select the geometry type of the layer):
- Points: Point Geometry type.
- Lines: Line Geometry type.
- Areas: Polygon Geometry type.
- Filter: The expression editor allows you to enter a SQL statement that when met shows the style on the map for the defined parameters.
- Legend Label: Enter a legend label name that uniquely identifies the layer, this is what will be seen in the tree view of the layers in enlighten.
- Style: The style opens the style editor that allows you to configure point/line/areas styles for the defined filter.
- Label: The label allows you to add a label to the map. This label is selected from the database table the layer is based on.
- Enable these styles (Select the geometry type of the layer):
- Save the layer by clicking the Save Resource button in the MapGuide Maestro toolbar.
Changing Drawing Order
The Drawing Order controls the order in which layers are drawn when the map is displayed. The order of layers represents a stack of layers viewed from the top.
To arrange layer drawing orders in MapGuide Maestro the following steps can be followed:
- In MapGuide Maestro expand your site folder and double-click on the Map Definition file located in the Site Explorer tree view.

Fig: Map Definition FileThis will open the Map Definition Editor.
- Select Layers in the map definition window.
- In Layers select Layers by Drawing Order.
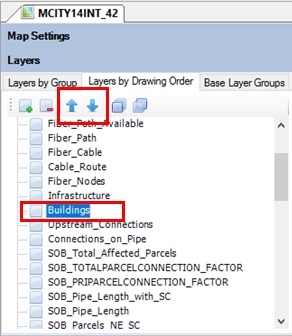
Fig: Drawing Order - Select a layer to move.
- Use the prompts in the Layers by Drawing Order menu tool bar to arrange the layers drawing order.
Configure External Provider Background Imagery
The Add External and Local Layers option on the Main Toolbar in enlighten allows users to display background maps on top of which their own spatial data will be displayed. Administrators must consult the 5.0_Enlighten_Installer.pdf document to understand how the initial Layout Resource is created in MapGuide Maestro, and how to configure the selection list of available External Providers for selection by the enlighten users within their organisation.
MapGuide Maestro is an Open Source map authoring tool for MapGuide Open Source application. The Maestro application does not have to be installed on the MapGuide server, and can be installed on the GIS Administrator's workstation. When logging into MapGuide Maestro application the user is prompted to connect to the server with the Administrator username and password combination.
This section looks at how to add to the list of External Providers for the existing Layout Resource configuration, with the understanding that the enlightenReactLayout is already created as part of the initial installation and configuration of enlighten. To add an External Provider map to the enlightenReactLayout resource, follow the steps below:
- Open MapGuide Maestro application and navigate to the website in the Site Explorer tree pane, for example, MCITY14INT_50
- Expand the required Website, for example, MCITY14INT_50 and click on the Layouts branch.
- Expand the Layouts branch and double-click on the resource called enlightenReactLayout.
- Under the list of Currently Available Maps, click on MapGuide so that the Map Group Settings pane is opened and the currently configured Child Map options are displayed.
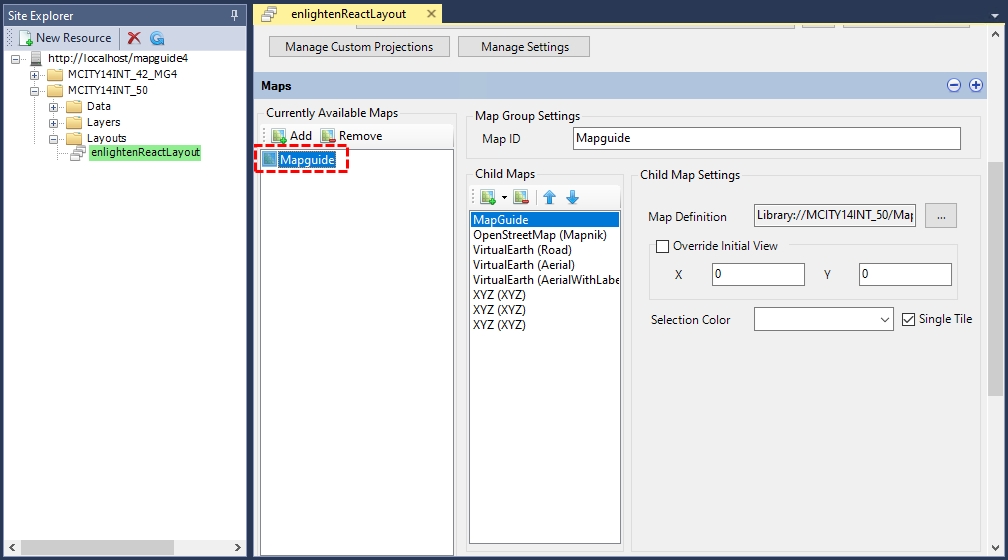
Fig: Expanding enlightenReacLayout resource - To add a new Map Resource for ArcGIS World Imagery (as an example), click on the Add New Map icon
 to display the drop-down list of available Maps to add. Select Generic XYZ Layer.
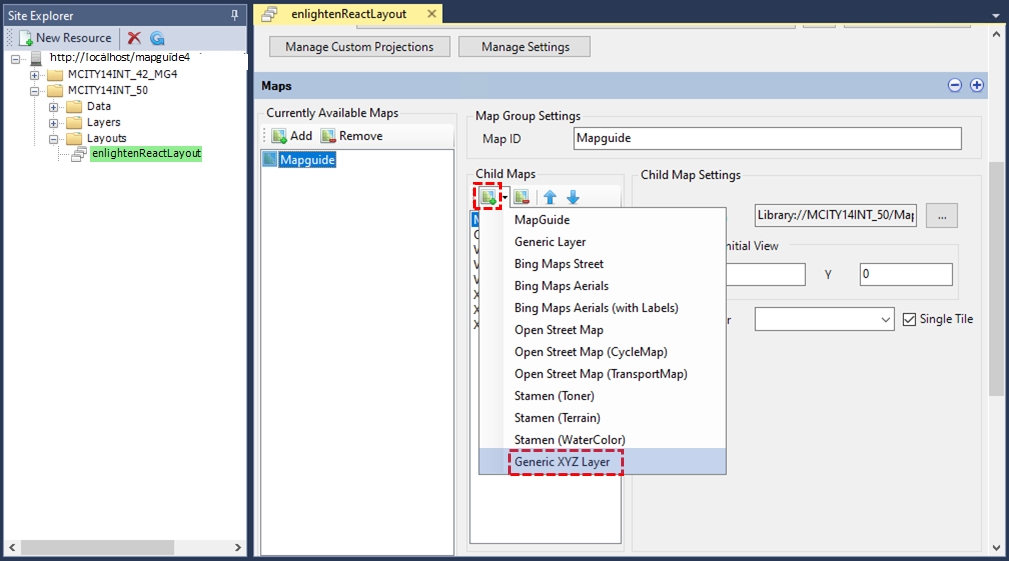
Fig: Mapguide Site Administrator - A new XYZ (XYZ) child map is added to the existing list of Maps with the Name Generic XYZ Layer
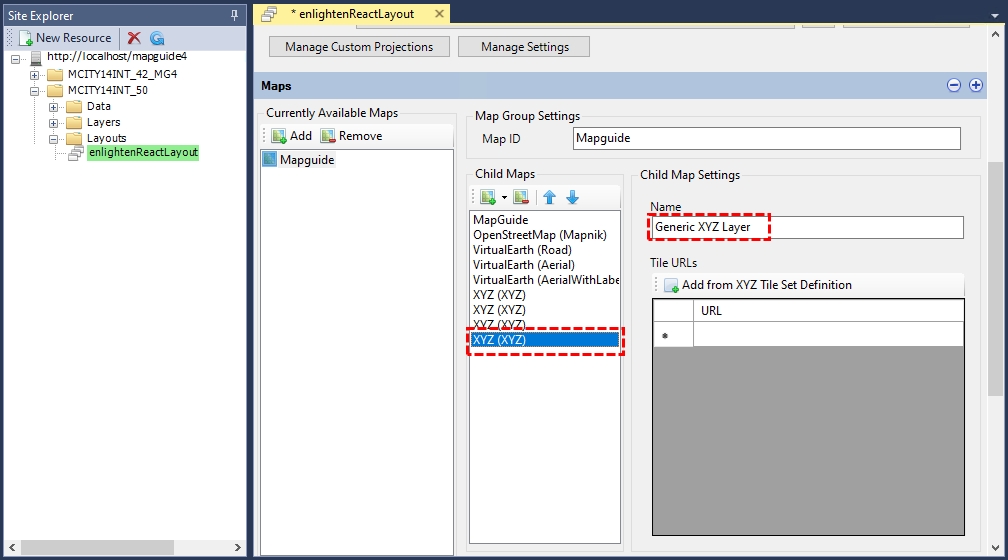
Fig: Generic XYZ Layer added to list of Child Maps - Rename the Child map to World Imagery and type the following REST Endpoint URL into the Tile URL text box https://services.arcgisonline.com/arcgis/rest/services/World_Imagery/MapServer/tile/{z}/{y}/{x}
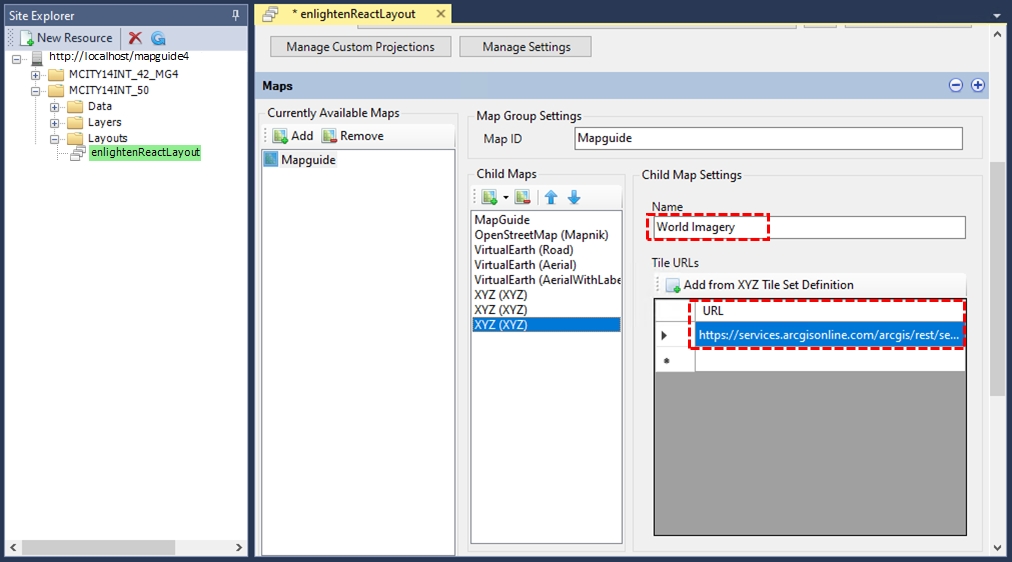
Fig: Add URL and Rename Child Map - The enlightenReactLayer tab attributes have been changed by adding a new Child Map, and display an asterisk * at the top of the tab header, so make sure before you exit Maestro to save the Resource by selecting the Save button
 .
. - In enlighten, when a user selects the Add External and Local Layers, the drop-down list of External Providers now includes the World Imagery option.
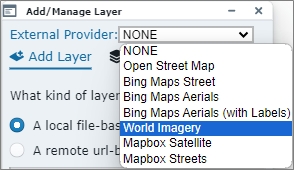
Fig: List of External Providers includes World Imagery
Map Performance Tool
The purpose of the test is to ascertain the performance of the enlighten Map Server when a given number of enlighten sessions are active at a given time.
Create a Map Performance User
To create a user the following steps can be followed:
- In MapGuide Site Administrator navigate to Manage Users > Add User.
- Define the User:
- User ID: Set to OSPerformance.
- User Name: Set to OSPerformance.
- Description: Set to enlighten Performance Monitoring Tool.
- Password: A unique password (This password should be made available only to authorized personnel who undertake Map Performance Testing)
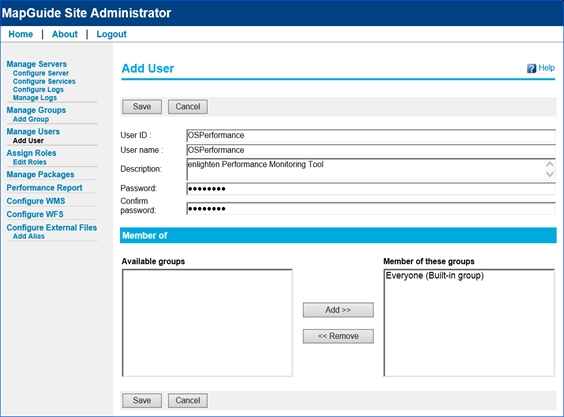
Fig: Mapguide Site Administrator
- Add the user by clicking on the Save button.
Map Performance Test
To start Map Performance testing the following steps can be followed:
- In enlighten Map View select the Map Performance Tool in the toolbar.
- Log in with the OSPerformance user details.
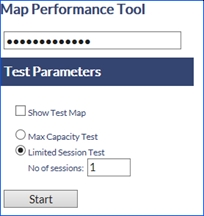
Fig: Map Performance Tool - Define the Map Performance Tool:
- Show Test Map: Display a section of the main map. Each Map Performance Test consists of automatically running a set number of zooming and panning tasks on the main map
- Max Capacity Test: Will activate map sessions continuously until the capacity of the enlighten Map Server is reached.
Note: That this test will cause the eventual failure of the Map Server. Refreshing the browser will halt the function. - Limited Session Test: Allows the User to nominate the number of sessions to be activated during the test run. This option will allow the user to undertake consecutive test runs with a varying number of sessions during each run.
- No of sessions: The number of consecutive tests to run when selecting a Limited Session Test.
The progress of the test runs, and the test performance details are displayed under the Performance Test Status area.
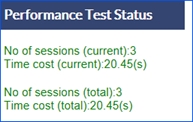
Fig: Performance Test Status area