Navigation Tools
The functions shown in this section are available from the main toolbar. It is possible to switch between large  small
small ![]() icons (option designed for mobile enlighten).
icons (option designed for mobile enlighten).
To switch between formats, double-click the Refresh  or Select
  icons.
The different navigation functions can be accessed by clicking on one of the following buttons
- Zoom to Coordinates
- Zoom Window
- Dynamic Zoom
- Zoom Previous/Next
- Zoom All
- Zoom to Initial Center and Scale
- Pan
- Zoom Slide Bar
 Zoom to Coordinates
This option allows zooming to ‘MGA 94 Zone 55’ specific coordinates or conversion of coordinates between datum’s as entered by the user. To activate the Zoom to Coordinates function, click on the Zoom to Coordinates tool. There are 3 options that the user can select:
- Zoom: The user must enter in the X (Long) and Y(Lat) coordinates and select the projections, before selecting the Zoom button.
- GPS Location: This populates the current location coordinates into the Zoom to Coordinates pane.
- Click on Map: When clicked the user must select a point on the map, which in turn auto-populates the projection and coordinates in the Zoom to Coordinates dialog. The user then selects the Zoom button to zoom to the selected point.
If the user wishes to Zoom to a user defined location by inputting coordinates, then the following parameters should be defined:
- From Projection: Choose the datum from the drop-down list of your known x,y pair of coordinates.
- X or Longitude: The user should enter the X coordinate or Longitude to be zoomed.
- Y or Longitude: The user should enter the Y coordinate or Latitude to be zoomed.
- To Projection: Choose the datum from the drop-down list your x,y pair of coordinates will be converted to.
- If the To projection selected was MGA 94 Zone 55 click on the Zoom button to see the location of the x, y, coordinates.
- The location will be marked on the map by a symbol configured by your enlighten administrator.
To access the Zoom to Coordinates function an https (secure page) is to be enabled. The user should also permit location access for this to work.
The zoom location selected using any of the 3 methods above results in a Zoom Coord symbol (Red Square) placed on a new layer called Zoom Coord which is displayed at the top of the Layers list.
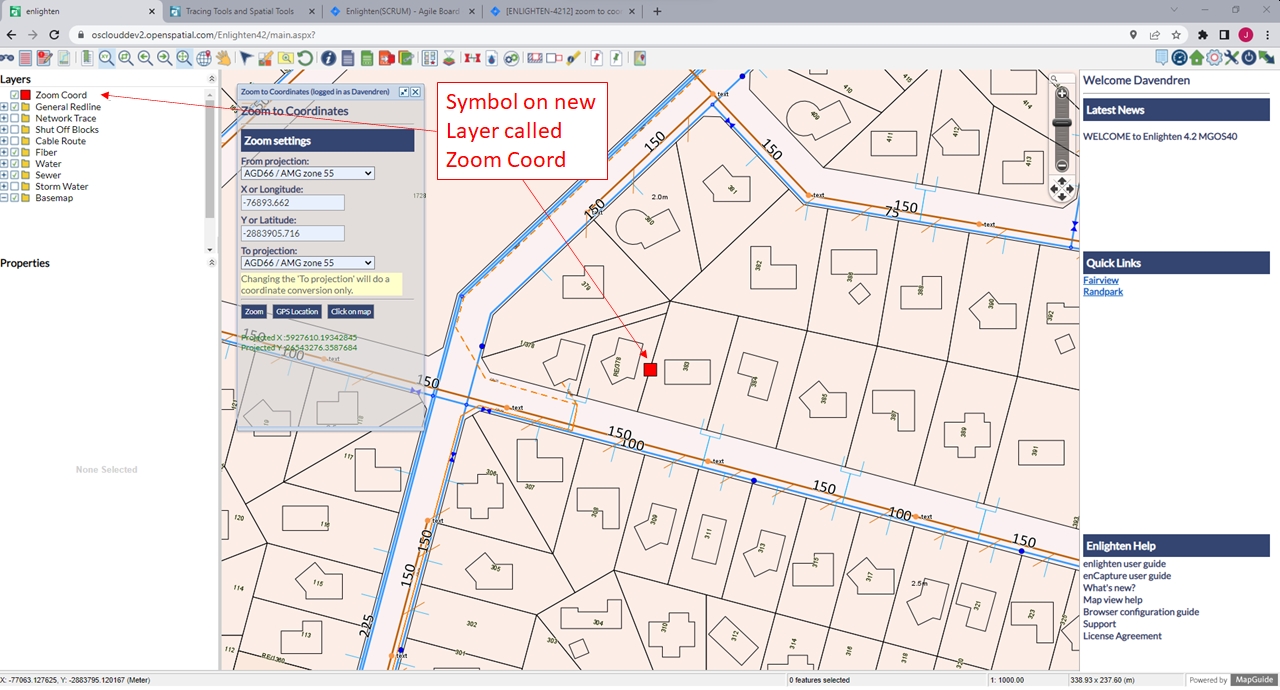
Fig: Zoom Coord layer with Symbol at selected coordinate location
 Zoom Window
This option allows zooming in to a specific area on the map by drawing a box around it. Simply hold down the left mouse button and drag it to define the area of interest. The advantage of this tool is that it stays active until another tool function is selected. The Zoom window tool can also be accessed in the right-click menu in the map window.
Dynamic Zoom
An alternative way to zoom in and out of the map is by rolling the mouse scroll wheel. To access this functionality, the map window must be active. To activate it, click first on the Pan or Select tools and then within the map window. To zoom in, roll the scroll wheel away, to zoom out, roll the scroll wheel towards you.

 Zoom Previous / Zoom Next
Use these options once or multiple times to return to the previous views or to go to the one after the current view if one previous zoom has been made. These options are also by right-clicking on the map window and selecting > Zoom.
 Zoom All
This button allows zooming out to the full extent of the data-set shown on the map. The map window will return to the default view, scale and settings as when first logged in but will maintain any additional layers such as buffers. The enlighten administrator can change the default behavior to a customized view extent (see enlighten Admin Guide) while the F5 key will reload the page back to the default settings, removing buffers and any additional layers created.
 Zoom to Initial Center and Scale
This feature allows the user to be re-directed to the initial center of the map, returning to the default view, scale and settings as when the user first logs into enlighten. Once zoomed, any additional layers such as buffers will still be maintained. To reload the page and remove any additional layers such as buffers, the user can hit the F5 key.
 Pan
Pan
This option allows moving the map in a certain direction while the current scale is maintained. Click on the map with the left mouse button and drag the view in a chosen direction. The pan tool can also be accessed by right-clicking on the map window.
Zoom Slider Control
The Zoom Slider Control allows the user to navigate around the map using the pan and zoom controls. Using the Slider Control the user can zoom in by sliding the control up towards the  symbol and zoom out by sliding the control down to the symbol
  . The map is zoomed around the map centre point.
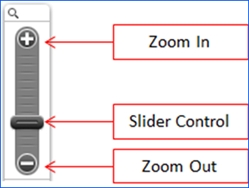
Fig: Zoom Controls
Selecting the arrow keys at the bottom of the Zoom Slider Control, the user can pan around the map in the direction of the arrows.

Fig: Pan Controls
For users working on an android tablet:
- To make a selection on the map, the user can achieve this by using a single finger and dragging on the map.
- To zoom in and out of the map, the user can move to fingers apart or together.
- To pan around the map, the user can use three fingers to navigate in the desired direction.
Selection Tools
 Selection
The Select option allows selecting single or multiple objects from the map window either by clicking on the object or by drawing a window around it. Multiple objects can be selected by holding the shift key. To remove an object from a multiple selection, hold the shift key and click on the object.
 Clear Selection
The Clear Selection tool is used to clear all selected features on the map. This option is also available in the context menu (right click menu).
 Selections
The Selections tool, located in the main toolbar, allows the user to save a new selection and to load or delete existing selections.
To create and save a new selection, first, you must select one or more map features and then click on the Selections button. The information selected from a previous nearest neighbour or spatial functions query can also be used. This will activate the Save Selection mode.
A side pane will appear on the right-hand side of the window, prompting the user to specify whether the selection should be private (may only be viewed by the current user) or public (may be viewed by everyone) and to type in a name for the selection. By clicking the Save button the selection will be posted to the database.
To save the selection to a file instead of to the database, choose the file format and click on Export to File button.
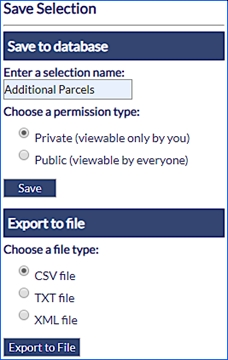
Fig: Save Selection Side Pane
When there are no selected objects in the map, activating the Selections tool will allow the user to load existing selections. To activate the Manage Selections mode, click on the Selections button. A side pane will appear displaying a drop-down list with all the selections available to the current user.
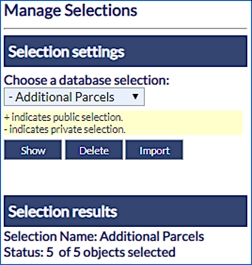
Fig: Load Selection Side Pane
Alternatively, from the same popup window, it is possible to delete a selection by highlighting it and then clicking the Delete button.
To load a selection saved in the database, choose it from the list and then click the Show button, the map will zoom to the features highlighted in that specific selection. When choosing a Selection to load, the Selection results are displayed below indicating the Selection Name and the number of objects included in the selection.
If you want to load a Selection from a file instead of from the database, click on the Import button. Browse to the file and click on Load File.
Selections can also be used to filter searches as described under the Search section. For example, if it is required to identify the lot and plan details of all the properties in a specific street of a specific town. As shown below, by using a saved selection of parcels highlighted on the map, the user can easily identify all properties in a certain town which has access to water.
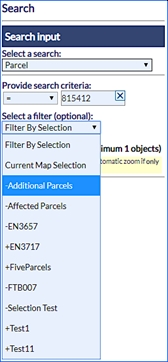
Fig: Using Selection to Filter Search Results
 Reload Map
This option will redraw the map at the current scale and restore the default layers which are turned on at that scale. Some functions such as a buffer and measure will not be removed by the Reload Map function. The user would have to reload the webpage or alternatively log out and re-login if necessary.
Forms
enlighten provides functionality to generate reports or to display information on selected features on your map. The various tools available for reporting are described below.
 Show Info
After having selected this tool, click on a location on the map. A Report Information window will then appear displaying information about all the map features that are located within two meters from that point, including features on all underlying layers.
This tool invokes the Advanced Forms window but can be changed by the administrator to invoke the Basic Form window.
 Basic Forms
This command is used to access the Report Information window.
- Select one or more map features.
- Click on the Basic Form button.
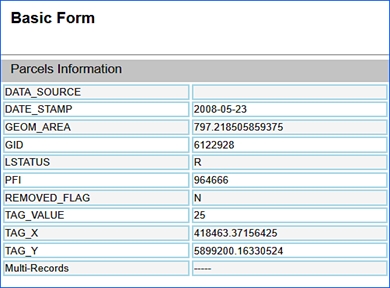
Fig: Report Information Box for a Single Feature - If multiple features are selected the following form will be displayed.
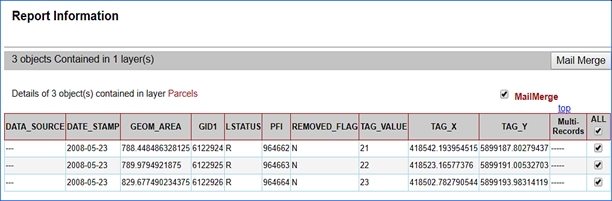
Fig: Report Information Box for Multiple Features - The information displayed in forms is customized by your enlighten administrator.
In the multiple features basic form you can double-click on a records results to access a basic form for the single feature. - Mail Merge in Basic Forms can be available from the multiple features basic form.
- Records are automatically selected but can be custom selected using the check-boxes at the end of each records row.

Fig: Selected Records in Basic Forms - To access mail merge tick the checkbox next to Mail Merge and select the Mail Merge button.
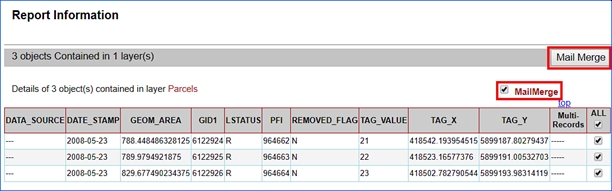
Fig: Accessing Mail Merge from a Basic Form - Once you activate Mail Merge a dialog box will appear.
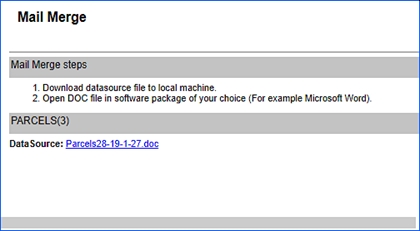
Fig: Mail Merge Dialog Box - Click on the document link in the dialog box to open a word document.
The word document will contain information configured by your administrator.

Fig: Basic Forms Information in Word
 Advanced Forms
The Advanced Form tool allows viewing and managing large amounts of information based on a selection of objects on layers within the map. To access this functionality first select one or more map features and then click on the Advanced Form button.
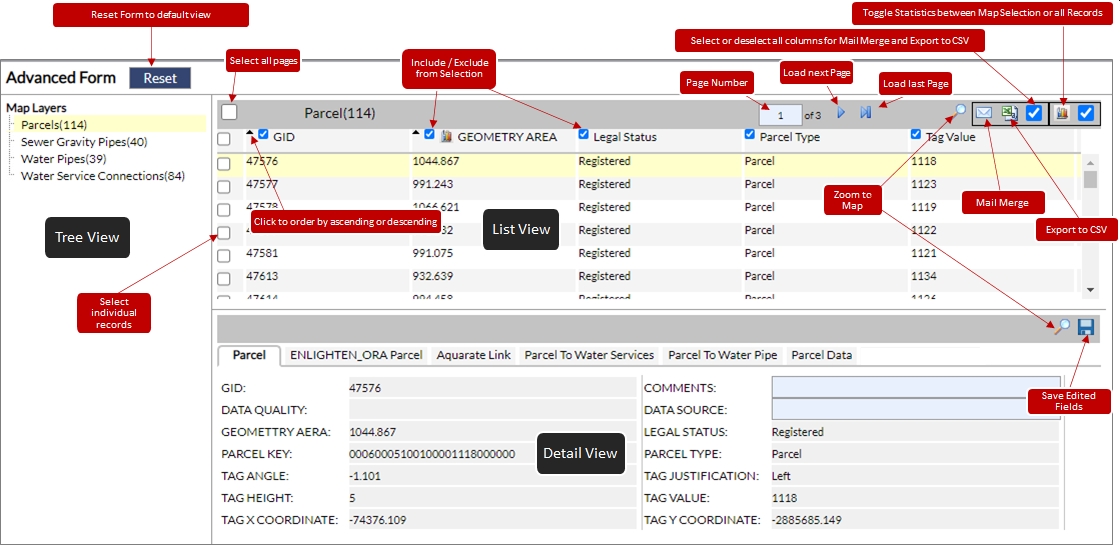
Fig: The enlighten Reports Window
The Advanced Form window has three main components for displaying feature information. These are Tree View, List View, and Detail View, and are described below.
- Tree View: Lists the layer names and the number of selected objects within each layer. When choosing a different layer in the Tree Viewb>, the information in the List View will change accordingly. The details available are configured by your enlighten administrator.
- List View: : Shows the attributes for each selected feature of a specific layer. For example, Parcel Type, Legal Status, Work Status, etc., are shown for each selected object belonging to the Parcels layer. Filter and options are included in the list view:
- List View Column Headers: The list view column headers can be selected to re-order the listed records in ascending or descending order.
- Filter: A further option available in the Advanced Form list view is to filter the listed records. This can be achieved by selecting the filter icon and enter a where clause as shown in the example below. In this instance, the records displayed will be only those entered between the 10th and 12th of September 2004.
The Help button lists the available columns as well as an example to assist in the construction of the filter clause.
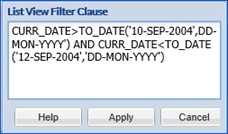
Fig: List View Filtering. - Options: Include mail merge, map view, export to CSV and statistics
- Mail Merge: Is an example of a configurable option set by the enlighten Administrator. By selecting this command, it is possible to generate a word document which may then be used to populate a mail merge document.
To access this functionality:
- Select the records to include in the mail merge document.
- Click on the Mail Merge/link found at the top of the List View, this will open a the Mail Merge dialog box.
- To open or save the file, click on the file name.
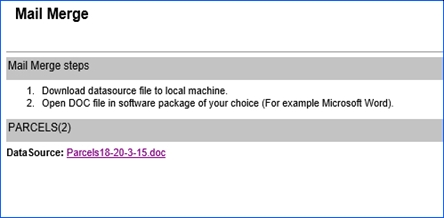
Fig: Word Document File for Mail Merge. - To choose the columns to be exported check the checkbox next to the column title.
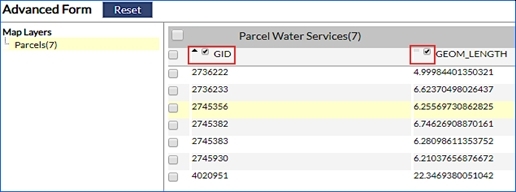
Fig: Advanced Forms Columns Selections.
If this window is resized and moved around, the user can restore the size, including the tree, list and detail view columns by clicking on the Reset button.- Map view: To locate one or more records on the map, tick the appropriate box and select the Map View link.
- Export to CSV: The information available via the advanced report window can be used for further analysis. Data can be exported to CSV file. To access this option:
- Select the records to export from the List View. To select only certain records tick the boxes next to the relevant features, to select all records on one page tick the box next to the column titles, to select all records tick the box All Pages.
- Click on the Export CSV link found at the top right-hand corner of the List View.
- To choose the columns to be exported double click on the column title and it will turn red.
- To open or save the file, click on the file name.
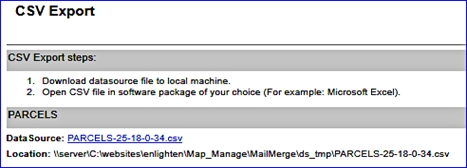
Fig: Export to CSV File.
- Statistics: Column statistics are available where an icon exists on the column header and will be configured by your enlighten administrator. Analytical statistics are available for numeric columns. Ordinal statistics are available for character columns. Statistics can be viewed for the data selected in advanced forms by checking the statistics box in the top right corner of the advanced forms dialog. Unchecking this box and clicking statistics on the column heading will give you statistics for the entire field from the database.
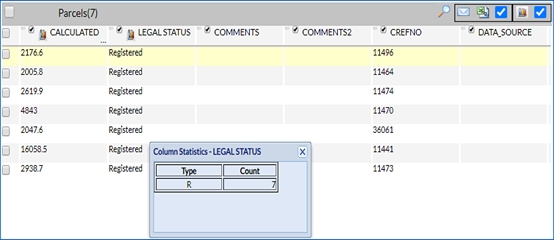
Fig: List View Column Statistics. - Further options or forms can be set up by the enlighten Administrator as required.
- Detail View: Shows all the information available for the feature highlighted in the List View. In some instances, it is possible to modify some attribute information and post the changes to the database.
- Zoom to Map: To locate records on the map select the record in the list view and then select the Zoom to Map link
 .
. - Tabs: Show all the forms that have been configured for the layer selected in the tree view. You can access different information by clicking on different tabs.
Note: If you click once on the tab in the detailed view, only the information in detailed view will change. To see the changes also in the list view you need to click once on the tab to change the detail view and then double click on the tab to change the list view. - Zoom to Map: To locate records on the map select the record in the list view and then select the Zoom to Map link
Editing data: Permissions to alter the data are assigned by the enlighten Administrator to specific users. Either type in the data as free text or select the information from a drop-down list and press save.
Fig: Editing Data in Advanced Forms
The user also has the ability to change information returned in the advanced form detail view, for single/multiple records. The Toggle to save single/multiple records feature introduces this convenience to the user and can be found on on the top right hand-side of the advanced form window, next to the Map View icon, and is only active when the Select All Pages tick-box is selected. This feature enables the user to edit information on editable fields, for multiple records at one time.
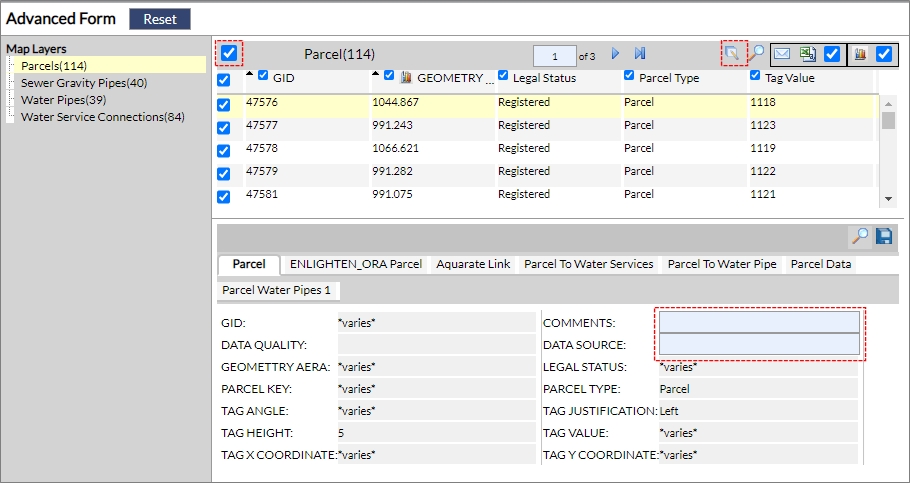
Fig: Toggle to save single/multiple records
To Edit Multiple Records the user should:
- When in the advanced form window, select multiple records in the list view.
- Click on the Toggle to save multiple records icon on the top right-hand side of the advanced form window (next to Map View).
- The user can then make the necessary changes within the detail view of the advanced form.
- Click on the Save icon, in the detail view to apply these specified changes.
Note: The user should have permissions assigned to them, by the enlighten administrator to edit advanced forms. - Show Primary Object: This feature closes the external floating pane and moves the information of the primary layer back to the list view and thereafter displays the appropriate tab on the detail view
 .
. - Change to List View: This feature moves the current tab information of the advanced form to the list view and thereafter opens an external floating pane displaying the primary information
 .
.
- Show Primary Object: This feature closes the external floating pane and moves the information of the primary layer back to the list view and thereafter displays the appropriate tab on the detail view
To change the Detail View tabs:
- Select Layers which the user wishes to view in the advanced forms section and click on the advanced forms icon.
- The advanced form results window should be displayed, and the user can click on the desired layer in the tree view, to retrieve a list of records (within list view) and detailed results (detail view). For this example Parcels is selected, and in the detail view the user notices multiple tabs to toggle through correlated with Parcels.
- When the user toggles between tabs, in this case Parcels, the user can click on the Parcel to Water Services tab , which is on the right hand side of the detail view.
This will essentially change the list view results, displaying records for Parcel Water Services. In doing so this also opens a floating pane displaying results for the initial primary tab i.e. Parcels.
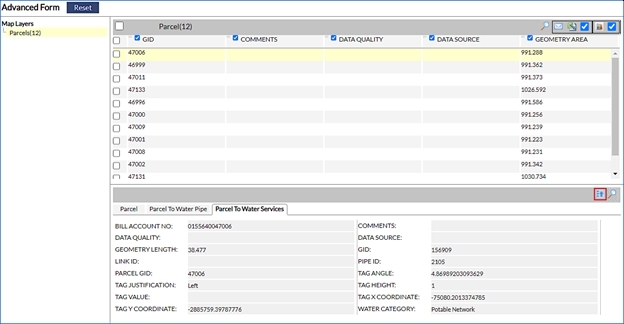
Fig: Advanced Form secondary tab
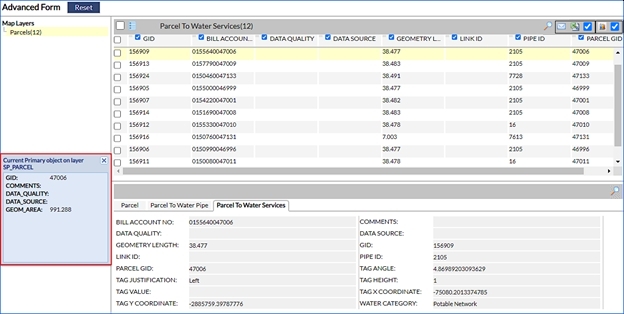
Fig: Advanced form Change to List view feature - Once the information in the list view has changed to display records for Parcel to Water Services, then the user can navigate to the primary tab i.e. Parcels and click on the change to list view icon
 , which would then allow then revert the information on the list view back to the default primary tab i.e. Parcels.
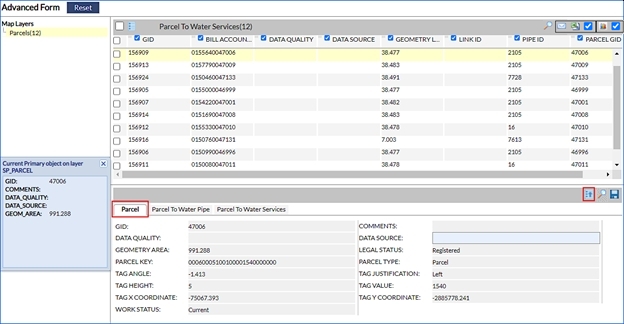
Fig: Change list view to Parcel
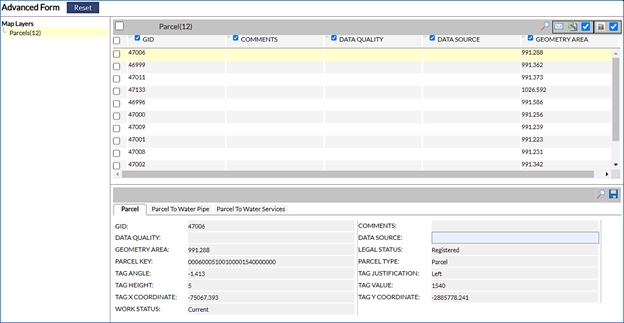
Fig: Advanced form reverted back to defaultNote: When the user does an advanced form on a layer which does not return any records, then the following text is displayed: “No records returned”.
Please check with the GIS Administrator to get more details.
By clicking on the details hyperlink, a note will display the time log stamp that is applicable to the error for the user/administrator to view.
Users also have the functionality available to Save Active Reports on Advanced Forms. This feature allows the users to have a tab open in the detailed view, and when closed and then reopened it would navigate to the last tab which was accessed. This means the system will not open the first tab as per the default action, it will return the last accessed tab which was cached.
To enable this setting:
- Navigate to Set User Options.
- Tick the checkbox Save Active Report.
- Click Apply.
When the user executes an Advanced Form on a Fiber Cable, and selects the Fiber Cable Strand tab within the detail view, an option becomes available for the user to navigate between individual strands. Whilst navigating between the individual strands in a Fiber Cable, the detail view displays information pertaining to the strand selected.
This functionality can save the user time, whilst still providing comprehensive information between the Fiber Cable and all of the individual strands contained within the Cable. This button can be located in the detail view of the advanced form, just above the secondary form tabs.
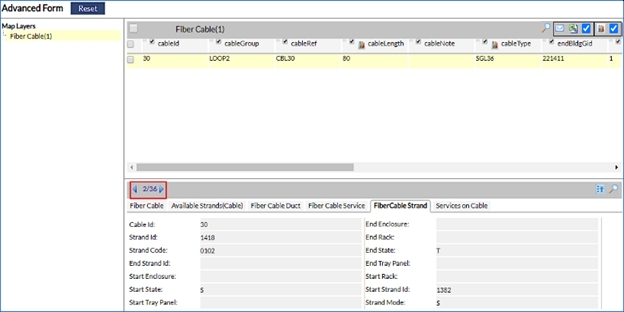
Fig: Fiber Cable Strand Information
 enCapture
enCapture is a new tool in enlighten that allows the user to keep records on objects defined by attribute data, for example, pipes, cars, and buildings. With enCapture, you are able to track events that occur to defined objects, for example, services, compliance tests, and inspections.
This tool will allow the user to keep complete and organized records about entities they are responsible for by spatially enabling asset data. Please see the enCapture User Guide for further information.
 Integration
The Integration tool allows third-party applications to be accessed from enlighten. The form or application that is launched is specific for each integration, therefore further details will be provided by your enlighten Administrator.
The enlighten integration utility does not produce an integration package. The Integration utility provides the enlighten administrator with the tools to maintain the integration packages and their associated functions to third-party applications.
The Modules Maintenance allows registering and maintaining any third-party applications that can be integrated with enlighten. The xml integrations that are supported are Aquarate, Authority and Proclaim (Technology one).
Layering Tools
 Layer Profiles
When selecting this tool from the main toolbar, the user layer profiles will display a list of saved user profiles by default there are two options default and preset layer. Users can save custom layer states by clicking on the New button and typing a name for this profile and then selecting Save.
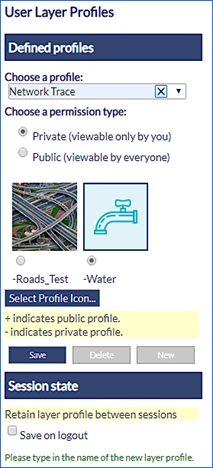
Fig: User Layer Profiles
Layer profiles will include whether the layer is on or off, if a layer can be selected and if the layer groups are expanded or collapsed.
To turn off these layers, select another User Layer profile or select Default to reset the map back to its default state.
Easily Clear input fields on a Mobile Device
When users access Enlighten from within a mobile device, then it becomes difficult to input and clear the input on text fields. As a solution to this, a distinct X button was added to allow the user to clear input by pushing one button, as opposed to hitting backspace multiple times.
This feature also makes it easier for the desktop user to quickly remove information from the input field, saving time and increasing efficiency.
The example below references User Layer Profile, and the X button is available for the user to clear the profile field.
![]()
Fig: Clear selection for Layer Profiles
 Layer Filter
The layer filter tool is similar to the search functionality in the fact that it uses SQL statements to display only entities within a layer that meet specific criteria. Please note that the layer needs to be within its visible scale range to be filtered on.
- To use layer filter, turn on the layer to be filtered and click on the Layer Filter icon.
- A working pane will open in the right-hand side of the screen.
- In this pane, you will be able to select a filter from a drop-down list (configured by the administrator).
- In the example below Water Pipes by Material is selected. The name of the filter is Water Pipes by Material, and the filter is setup to filter on all pipes that contain Polyvinyl Chloride material.
- Select one of the available filters and type in or choose the required value as shown in the example below.

Fig: Selected Layer Filter Represented by an Asterisk
After clicking on OK, all the registered pipes that are of Polyvinyl Chloride Material will only be displayed hence removing pipes of other materials from the map temporarily. To clear a filter selection hit the reset button. The reset button is only active when the working filter is selected.
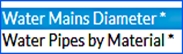
Fig: Multiple Filters Active
The example above uses Water Mains Diameter and Water Pipes by Material which are layers based on the SP_WATPIPE spatial table. The user can see which filters are active by the asterisk next to the name.
If the user applies Filter A (Water Mains Diameter) on a specific layer, the results will be returned accordingly. Thereafter if the user applies a second Filter B (Water Pipes by Material), the results returned will consider both Filter conditions.
An example of this is when the user applies a Filter on the Water Mains Diameter where the Diameter is = 100mm, thereafter places another Filter on Water Pipes by Material where Material Type = Polyvinyl Chloride Material. The results that will be returned after the second filter, will show all Pipes with a Diameter of 100m but which are of Polyvinyl Chloride Material.
Replace existing filter. This functionality takes into consideration the abovementioned dual filter which is applied and ensures that the first filter condition is cleared / ignored when running the second filter.
To Reset both filters, the user can refer to the Reset All button, which would then return all records of a specific layer, removing all filters from the map.
Save layer filters on exit is a function which ensures the logged in user, retains the layer filters upon logout. If the layer filters are intended only for the current session, then the logged in user should ensure that this checkbox is not ticked.
The filtered objects can be selected and saved and/or their attributes exported via Advanced Forms.