Map Site Administration
Numerous items are configurable in MapGuide Open Source (MGOS). This section will describe some basic features that can be used with enlighten.
- Layer Naming Conventions: Standard layer naming conventions.
- Map Symbol List: Creating a symbol list for layers.
- Context Menu: Create a right‐click menu over a map area.
- Adding a Layer in MapGuide Maestro: Creating and maintaining layers.
- Adding Groups and Layers to enlighten: Creating and maintaining groups.
- Theming a Layer in MapGuide Maestro: Layer theming and maintenance.
- Changing Drawing Order in MapGuide Maestro: Arranging layer and group drawing order.
- Setting up Flexible Map Launcher: Setting up Flexible Map Launcher via Mapguide Maestro.
Layer Naming Setup Instructions
Please ensure you adhere to the following rules when naming map layers for use within enlighten.
For names of layer group and layers:
- Begin with characters (not numbers).
- Characters: A, B, C... OR a, b, c ...
- Numbers: 0,1,2,3,4,5,6,7,8,9.
- Symbols: _ Only.
- Length: Maximum 100 characters.
- Do not give the same name to different layers and groups.
For labels of layer groups and layers:
- Begin with characters (not numbers).
- Characters: A, B, C... OR a, b, c ...
- Numbers: 0,1,2,3,4,5,6,7,8,9.
- Symbols: (, ), _, %, Space.
- Length: Maximum 100 characters.
Other:
- Check Allow access to map layer setup from API for every layer.
Map Symbol List
To insert symbols in the enlighten map, one or more symbols should first be added to a MapGuide Maestro Symbol Library. In symbol libraries, you can use Portable Network Graphics (PNG). Create your own symbols in AutoCAD Map 3D or another application and then import them into MapGuide Maestro.
To add a new symbol library in MapGuide Maestro the following steps can be followed:
- In MapGuide Maestro expand your site folder and right-click on the Symbols folder located in the Site Explorer tree view.
- Select New Resource from the menu.
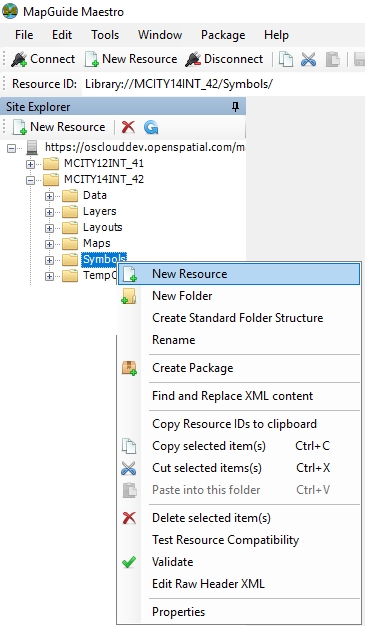
Fig: Create New Resource - Select Simple Symbol Definition from the Default selection.
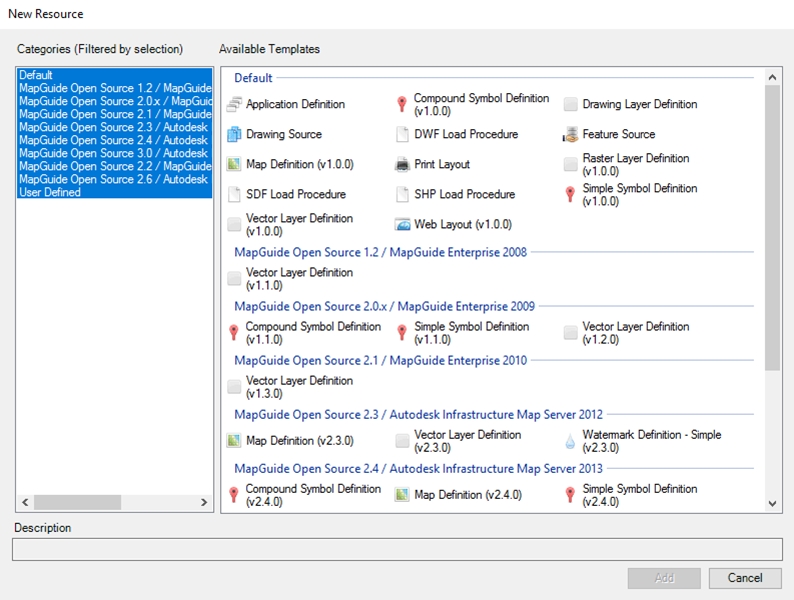
Fig: Simple Symbol DefinitionThis will open the New Resource window.
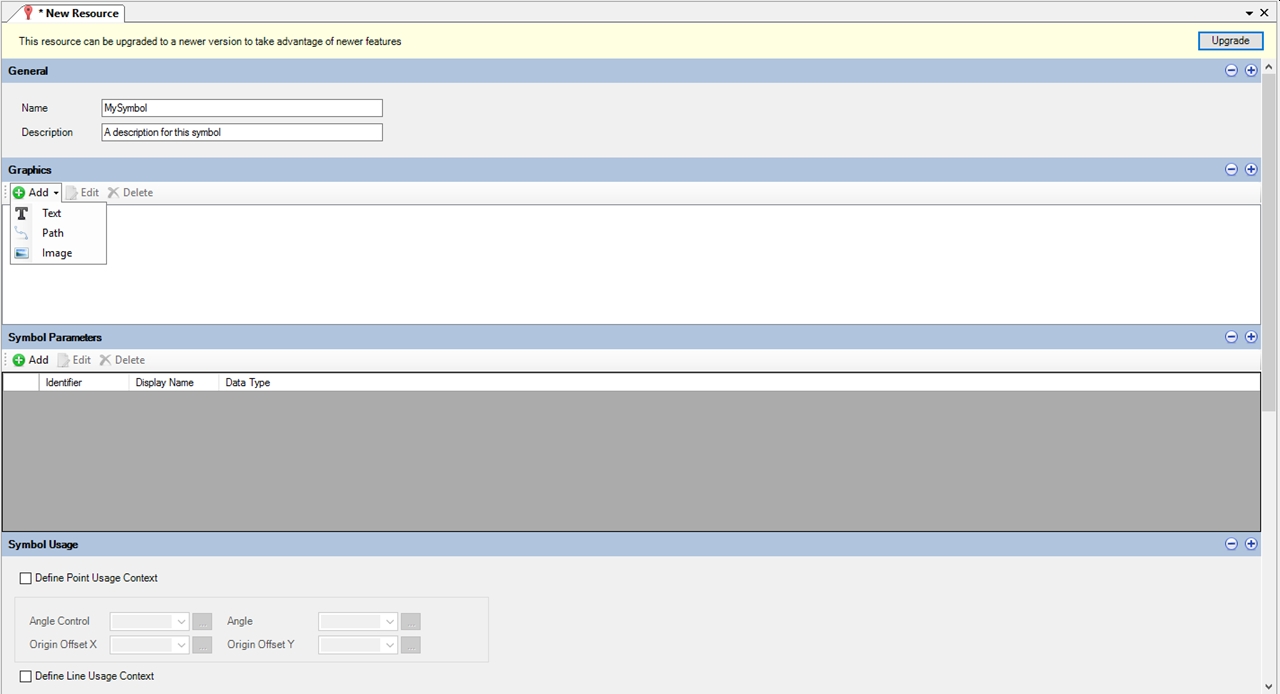
Fig: New Resource Symbol - Define the Symbol:
- Name: Enter a symbol name that uniquely identifies the symbol.
- Description: Enter a description that uniquely identifies the symbol.
- Define the Symbol Type:
- Text: Text Elements.
- Path: A Geometric Path.
- Image: PNG Images.
- Save the symbol by clicking the Save Resource button in the MapGuide Maestro toolbar.
To import Autodesk Infrastructure Studio (AIM) symbol libraries into MapGuide Open Source (MGOS ) please contact support@openspatial.com for more information.
Context Menu
The context menu is available when you right‐click over a map area. You can specify additional components to include or exclude in the right-click menu.
To change the context menu order/layout in MapGuide Maestro the following steps can be followed:
- In MapGuide Maestro expand your site folder and double-click on the Web Layout located in the Site Explorer tree view.
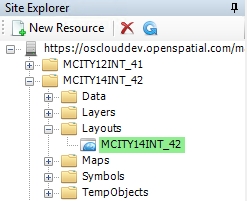
Fig: Web Layout FileThis will open the Web Layout Editor.
- Select Menus and Toolbars in the web layout window.
- Select Context Menu in Menus and Toolbars.

Fig: Context Menu - To customize the context menu simply drag and drop new commands.
- To remove, reorder or add items use the prompts in the context menu tool bar.
- Save the context menu by clicking the Save Resource button in the MapGuide Maestro toolbar.
Adding a Layer in MapGuide Maestro
To add a new layer in MapGuide Maestro the following steps can be followed:
- In MapGuide Maestro expand your site folder and right-click on the Layers folder located in the Site Explorer tree view.
- Select New Resource from the menu.
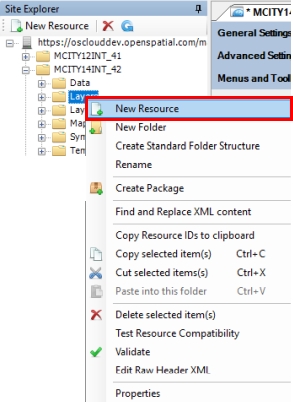
Fig: Adding a New LayerThis will open the New Resources screen where the user selects the Vector Layer Definition template, then selects the Add button to continue.
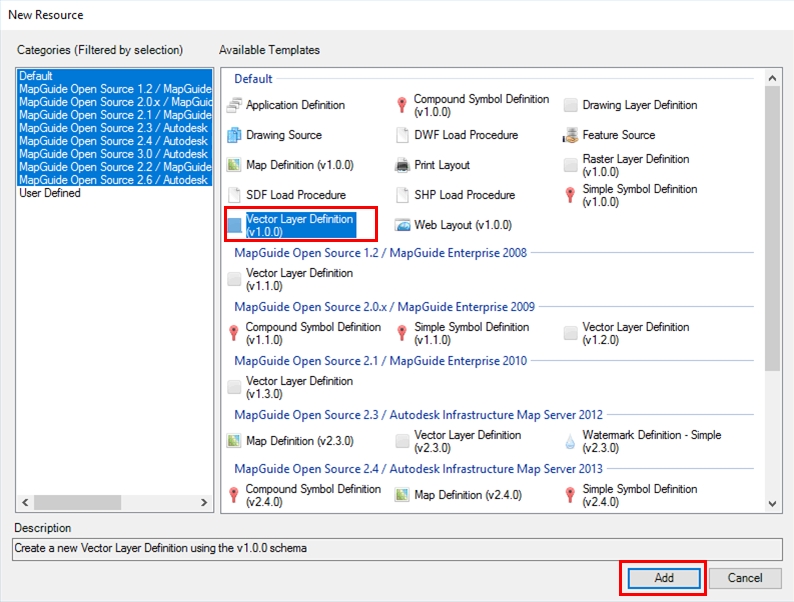
Fig: Add new Layer Resource - On the Select Resource dialog box, select the Data Folder in the Site Explorer tree view, then select the Resource from the list of available Resources so that the Name is populated, and then select the OK button to continue.
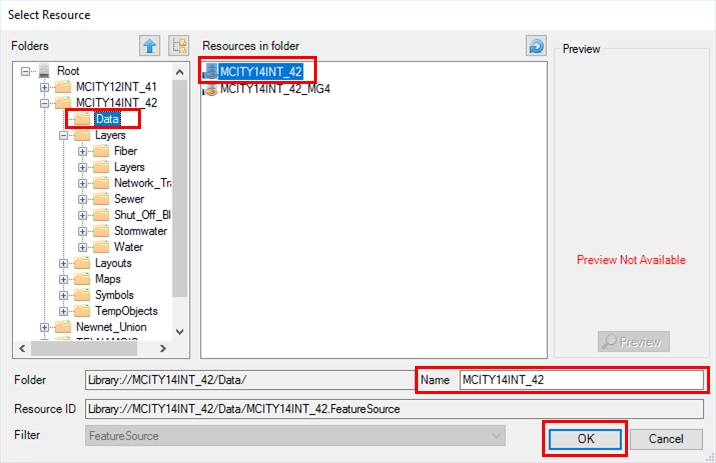
Fig: Select Resource from Resource list - On the New Resource screen, select the three dots ... at the end of the Feature Class to display a list of available Layer Resource items, select the item to be authored, and select the OK button to continue.
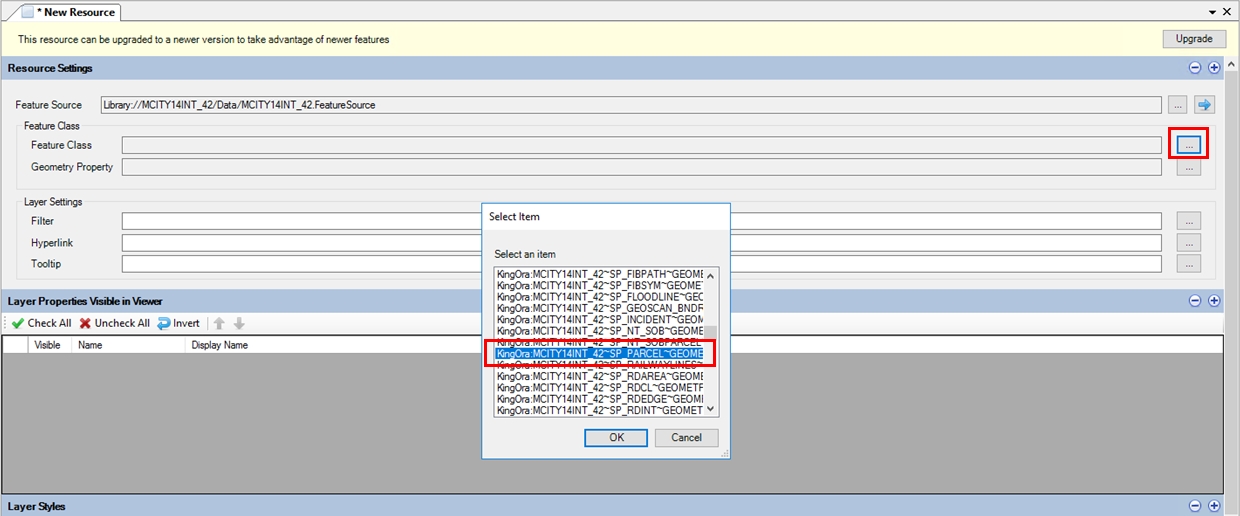
Fig: Select the Feature Class list of Layer Resource Items - Once the Feature Class is selected from the list the Geometry Property is updated from the selection.
- Select which Layer Properties you require visible in the viewer. If you want all properties to be visible, select the Check All button and all check-boxes will be ticked.
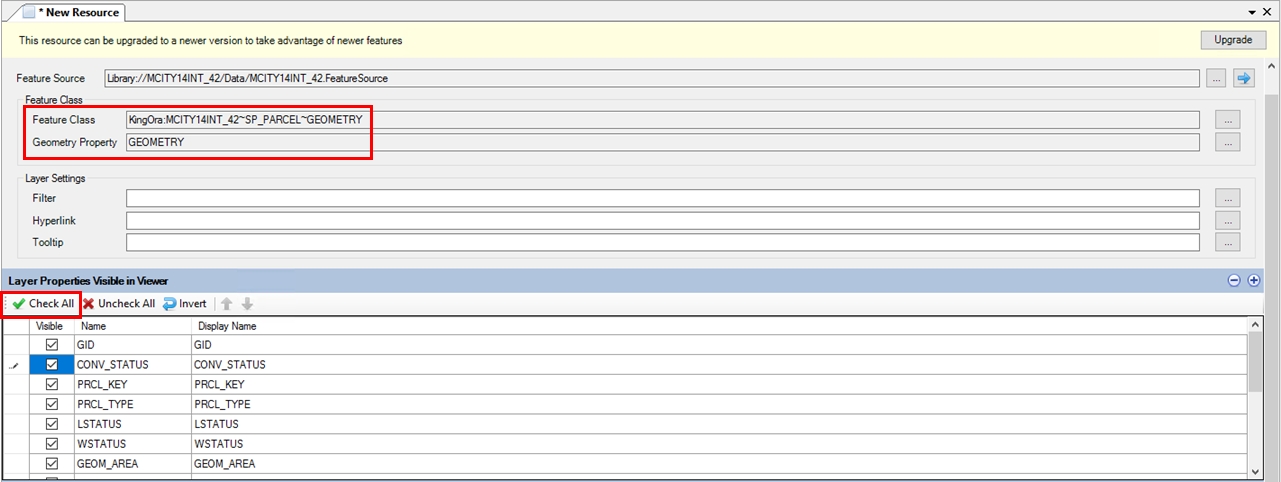
Fig: Select the Layer Properties to be visible in Viewer - Select how you want to style the layer in the Layer Styles section and set the following criteria:
- Set which style will correctly represent the object to be authored. Select either Points, Lines or Areas based on the following guidelines.
- Objects which have a single X;Y coordinate should be styled as POINT objects, e.g.: Town Name
- Objects which multiple coordinates should be styled as LINE objects, e.g.: River Line
- Objects which multiple coordinates which start and end at the same coordinate should be styled as AREA objects, e.g.: Lake
- Set the Scale Range you want the layer to be visible at e.g. Min Scale 0 and Max Scale 5000. This will display the object at a scale of between 0 to 5000 units.
- Set the Filter colour to apply to the object.
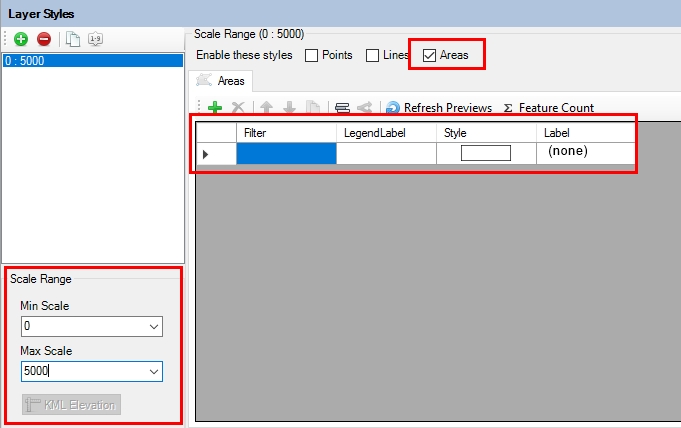
Fig: Set the Layer Styling - Set which style will correctly represent the object to be authored. Select either Points, Lines or Areas based on the following guidelines.
- Save the layer by clicking the Save Resource button in the MapGuide Maestro toolbar at the top of the screen.
This will open the Save Resource window where the user must first select the Layers folder from the Folders tree view, select the applicable Resource, then enter the layer Name that will appear in the map legend.
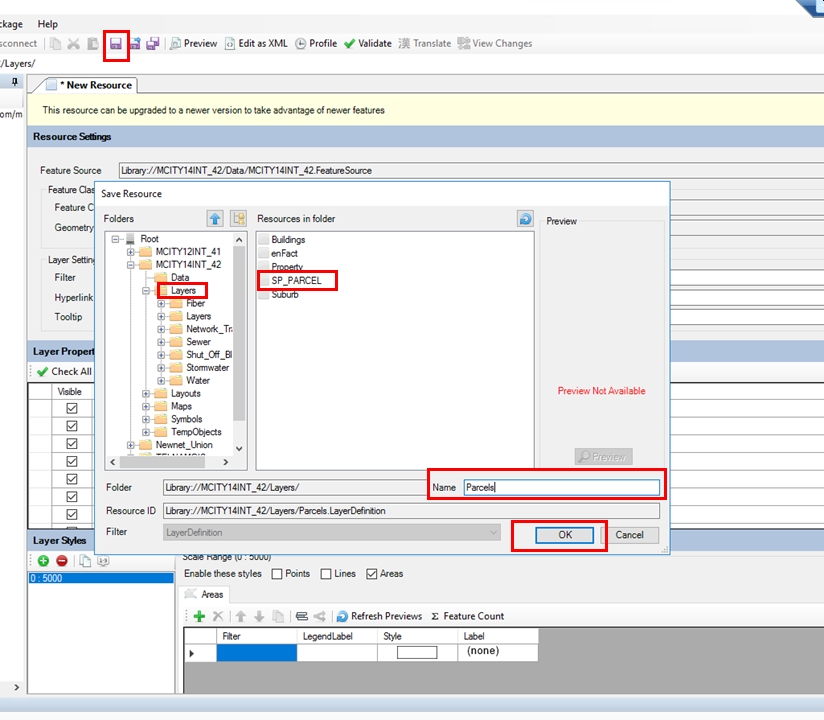
Fig: Save Layer Resource - Click the OK button to save the layer.
Adding Groups and Layers to enlighten
To visualize your data in enlighten it first needs to be added to the map definition file. Layers can be added individually or as groups.
To add a new group in MapGuide Maestro the following steps can be followed:
- In MapGuide Maestro expand your site folder and double-click on the Map Definition file located in the Site Explorer tree view.
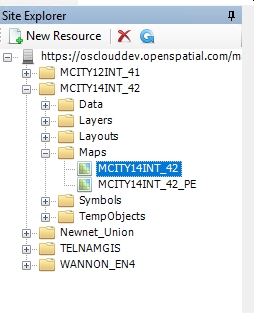
Fig: Map Definition FileThis will open the Map Settings screen.
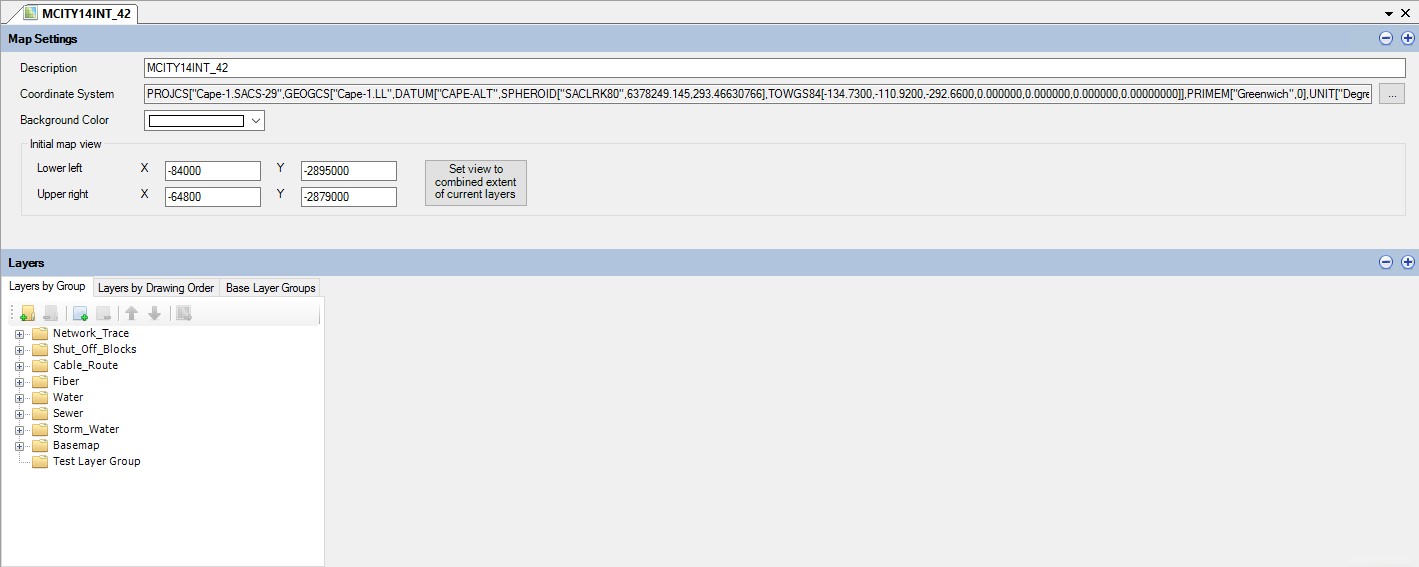
Fig: Map Settings - Select the Add a new Group button in the Layers by Group toolbar.

Fig: Add new Layer Group - Define the new group:
- Name: Enter a group name that uniquely identifies the group.
- Legend Label: Enter a description that uniquely identifies the group.
- Define the groups Common Properties:
- Expand in legend: Set to False.
- Show in Legend: Set to True.
- Visible: Set to True.
- Select the new group and select Add a new layer from the from the Layers by Group toolbar.
This will open the Select Resource window.
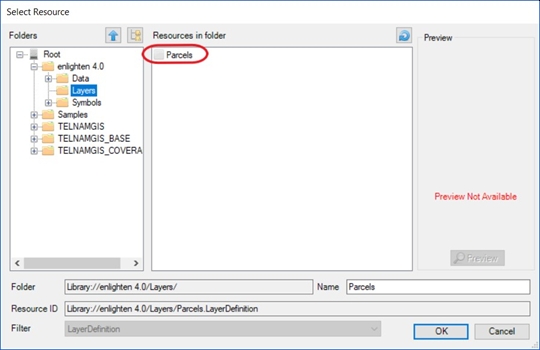
Fig: Select Resource - Select the Layers folder from the Folders tree view.
- Select the layer from the Resources in Folder view to include in the group.
- Click the OK button to add the layer to the group.
Theming a Layer in MapGuide Maestro
Once a layer has been created it can be customized in the layer editor.
To customize a layer in MapGuide Maestro the following steps can be followed:
- In MapGuide Maestro expand your site folder, expand the Layers folder and double-click on the layer you want to customize in the Site Explorer tree view.
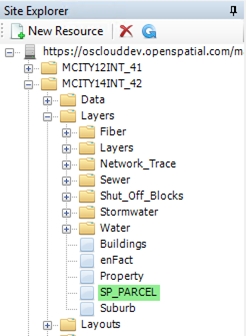
Fig: Layer FileThis will open the Layer Definition Editor.
- Select Layer Styles in the layer window.
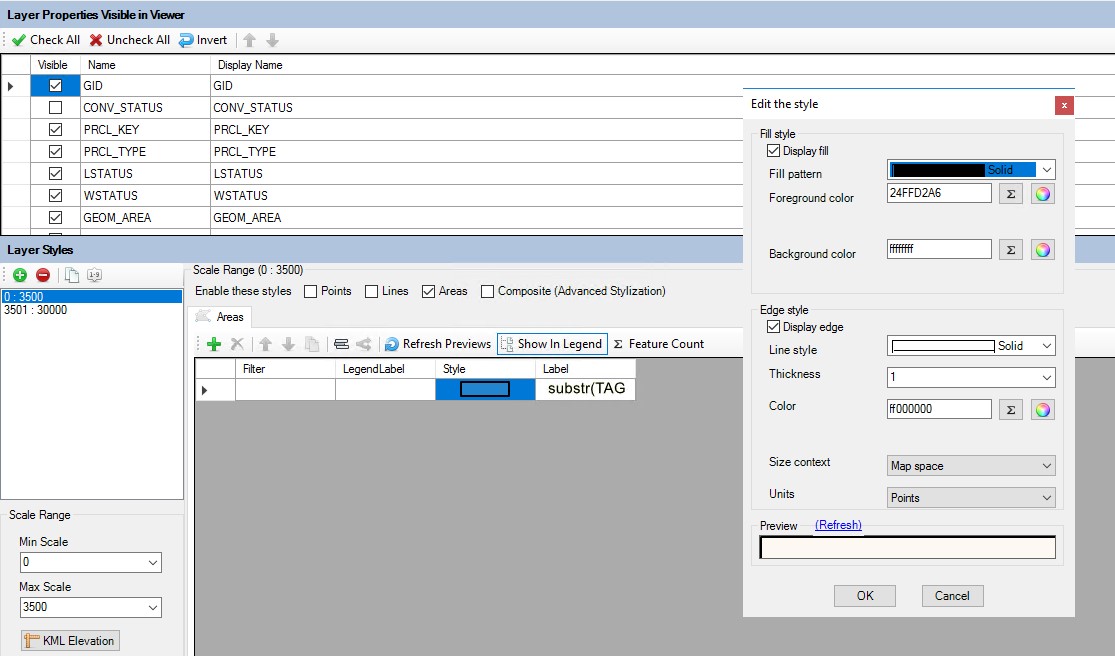
Fig: Layer Styles - Define the Layer Styles:
- Enable these styles (Select the geometry type of the layer):
- Points: Point Geometry type.
- Lines: Line Geometry type.
- Areas: Polygon Geometry type.
- Filter: The expression editor allows you to enter a SQL statement that when met shows the style on the map for the defined parameters.
- Legend Label: Enter a legend label name that uniquely identifies the layer, this is what will be seen in the tree view of the layers in enlighten.
- Style: The style opens the style editor that allows you to configure point/line/areas styles for the defined filter.
- Label: The label allows you to add a label to the map. This label is selected from the database table the layer is based on.
- Enable these styles (Select the geometry type of the layer):
- Save the layer by clicking the Save Resource button in the MapGuide Maestro toolbar.
Changing Drawing Order
The Drawing Order controls the order in which layers are drawn when the map is displayed. The order of layers represents a stack of layers viewed from the top.
To arrange layer drawing orders in MapGuide Maestro the following steps can be followed:
- In MapGuide Maestro expand your site folder and double-click on the Map Definition file located in the Site Explorer tree view.
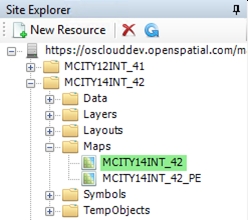
Fig: Map Definition FileThis will open the Map Definition Editor.
- Select Layers in the map definition window.
- In Layers select Layers by Drawing Order.
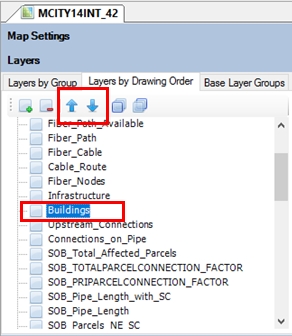
Fig: Drawing Order - Select a layer to move.
- Use the prompts in the Layers by Drawing Order menu tool bar to arrange the layers drawing order.
Setting up Flexible Map Launcher
Flexible Map Launcher is setup within Mapguide and once configured will be be displayed in a pop-up window showing the enlighten map and related layers. This flexible map will be displayed in a different User Interface (UI) and allows for the customization of widgets.
Flexible Map Launcher allows for many different types of maps to be displayed such as Google maps, Open Street maps and Streetview maps within the viewer.
For a detailed explanation on how to configure Flexible Map Launcher, kindly visit:
https://trac.osgeo.org/mapguide/wiki/maestro/UserGuides/FusionEditor
Map Performance Tool
The purpose of the test is to ascertain the performance of the enlighten Map Server when a given number of enlighten sessions are active at a given time.
Create a Map Performance User
To create a user the following steps can be followed:
- In MapGuide Site Administrator navigate to Manage Users > Add User.
- Define the User:
- User ID: Set to OSPerformance.
- User Name: Set to OSPerformance.
- Description: Set to enlighten Performance Monitoring Tool.
- Password: A unique password (This password should be made available only to authorized personnel who undertake Map Performance Testing)
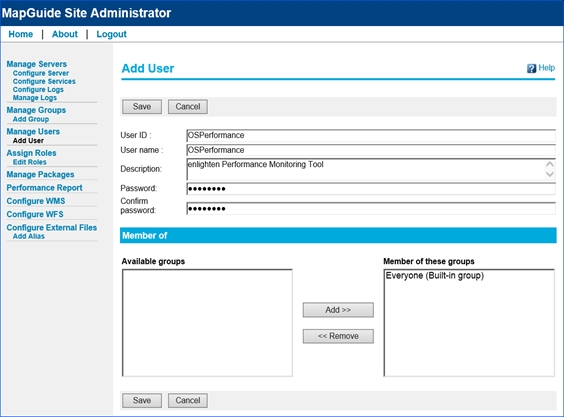
Fig: Mapguide Site Administrator
- Add the user by clicking on the Save button.
Map Performance Test
To start Map Performance testing the following steps can be followed:
- In enlighten Map View select the Map Performance Tool in the toolbar.
- Log in with the OSPerformance user details.
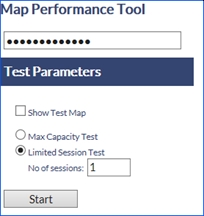
Fig: Map Performance Tool - Define the Map Performance Tool:
- Show Test Map: Display a section of the main map. Each Map Performance Test consists of automatically running a set number of zooming and panning tasks on the main map
- Max Capacity Test: Will activate map sessions continuously until the capacity of the enlighten Map Server is reached.
Note: That this test will cause the eventual failure of the Map Server. Refreshing the browser will halt the function. - Limited Session Test: Allows the User to nominate the number of sessions to be activated during the test run. This option will allow the user to undertake consecutive test runs with a varying number of sessions during each run.
- No of sessions: The number of consecutive tests to run when selecting a Limited Session Test.
The progress of the test runs, and the test performance details are displayed under the Performance Test Status area.
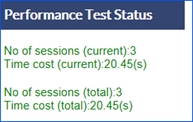
Fig: Performance Test Status area