Installing Attributor for Autodesk Products
To install and configure Attributor for Autodesk products, you should follow these high-level steps. Each is detailed further in the following sections of this document:
1. Download Attributor.
2. Install Attributor.
3. Open AutoCAD and configure search paths.
4. Close and re-open AutoCAD and confirm Attributor Ribbon Menu, and Attributor Sample Menu is available.
Download Attributor for Autodesk Products
The Attributor tool for Autodesk products can be found online on the Autodesk app store, alternatively to be automatically redirected click on this link.
Install Attributor for Autodesk Products
1. Navigate to the folder to which the Attributor.msi file was downloaded.
2. Double click on the installation file.
3. Click on Install Now to install the Attributor tool.
4. Window should prompt the user for permission for the app to make changes to the device. The user should click on Yes to proceed.
5. Click on Close upon the finalization of the installation process.
The Attributor product is generally installed in the following folder:
C:\Program Files\Autodesk\ApplicationPlugins.
Open AutoCAD and configure search paths
After the installation of the Attributor, the user would be required to define the search paths within AutoCAD to enable AutoCAD to find the desired block drawings and related configuration files. The user may need to ensure that AutoCAD has permissions to the Attributor folder, which should be defaulted to C:\ProgramData\Autodesk\AppliactionPlugins.
To achieve this the user should:
1. Open AutoCAD.
2. Right click within the workspace > Click on Options.
3. On the Files tab, expand the Support File Search Path folder.
4. Click on Add.
5. Enter the path where the example resources provided with Attributor are located. By default this would typically be as shown below. If you moved or copied the resources folder, set the path to that location.
Path: C:\ProgramData\Autodesk\ApplicationPlugins\Attributor.bundle\Application\Resources.
Tip: You can copy the full folder path from file explorer and paste it into path when using Add. This helps prevent unexpected typical errors.
6. Once done Click on Apply > Click on OK.
7. Once access has been set to the resources folder, close AutoCAD and re-open it for the changes to take effect.
Confirm the Attributor Ribbon Menu is Available
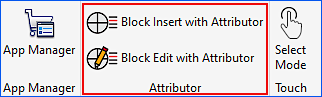
Attributor is shipped with an Attributor panel which the default install should have added to the Add-ins menu as shown below. There should also be a top/text Attributor_Sample_Menu showing.
If you don't see the Attributor menu as shown above, then you will need to load it manually using the MENULOAD command as follows:
1. Type "MENULOAD" in the command line > hit ENTER.
The Load/Unload Customizations dialog box opens.
2. Click on Browse.
3. Navigate to C:\Program Files\Autodesk\ApplicationPlugins\Application\Resources.
4. Select the file attributor.cuix and click Open.
5. Click on Load.
6. Click on Close.
7. Close and Re-open AutoCAD for the changes to take effect.
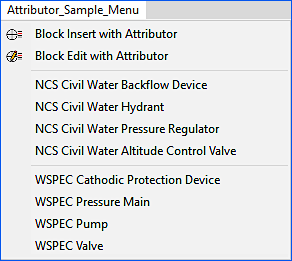
When the customization file is loaded, by default the Add-Ins menu will have the Attributor functions showing within the ribbon. In addition to the ribbon panel, the Attributor_Sample_Menu (text menu), should also be active and should be displayed on the top text menu bar. An example of the Attributor_Sample_Menu is shown below:
Tip: If there is no top menu bar showing or you dont see the Attributor_Sample_Menu.
Confirm the AutoCAD command MENUBAR setting is set to 1.
Simply type MENUBAR in the AutoCAD command line and set it to 1.
Installing Attributor for BricsCAD
To install and configure Attributor for BricsCAD, you should follow these high-level steps. Each is detailed further in the following sections of this document:
1. Download Attributor.
2. Install Attributor.
3. Confirm the Attributor Ribbon Menu and Attributor Sample Menu is Available.
Download Attributor for BricsCAD
The Attributor tool for BricsCAD can be found online on Open Spatial's As Constructed web site under the Downloads section, alternatively to be automatically redirected click on this link.
You will be required to have an Account to access the downloads page. If you do not have an Account, you will be required to complete the online form requesting an Account. If you do have an Account, select the option 'Already a member? Download here' where you will be redirected to the Log In page.
1. On the Log In page, sign in to your Account with your Username and Password.
2. Select the option to download Attributor for BricsCAD.
3. This will download the zip file, as well as provide you with your License Key in a pop-up screen.
4. By default the License Key will be sent to the Registered email account, however you can also select the 'Copy Key' option to copy the License Key required to activate the product.
5. Open your downloaded zip file and extract the file contents.
Install Attributor for BricsCAD
1. Navigate to the folder to which the Attributor.msi file was downloaded.
2. Double click on the installation file.
3. Windows should prompt the user for permission for the app to make changes to the device. The user should click on 'Run anyway' to proceed.
4. Step through the installer process.
5. Click on Close upon the finalization of the installation process.
The Attributor product is generally installed in the following folder:
C:\ProgramData\Bricsys\Attributor.
Confirm the Attributor Ribbon Menu and Attributor Sample Menu is Available
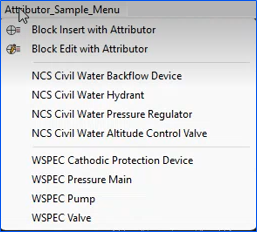
Attributor is shipped with an Attributor panel which the default install should have added to the Add-ins menu as shown below. There should also be a top/text Attributor_Sample_Menu showing.

If you don't see the Attributor Ribbon menu as shown above, you will need to check the Ribbon State settings within the Program Option Settings to ensure the Show ribbon bar setting is ticked.
As part of the Attributor installation, the Program folder paths are added by default to the System settings.

When the customization file is loaded, by default the Add-Ins menu will have the Attributor functions showing within the ribbon. In addition to the ribbon panel, the Attributor_Sample_Menu (text menu), should also be active and should be displayed on the top text menu bar. An example of the Attributor_Sample_Menu is shown below:
If you don't see the Attributor Sample menu as shown above, then you will need to check the Menu bar settings within the Program Option Settings to ensure they are set to show the menu bar.